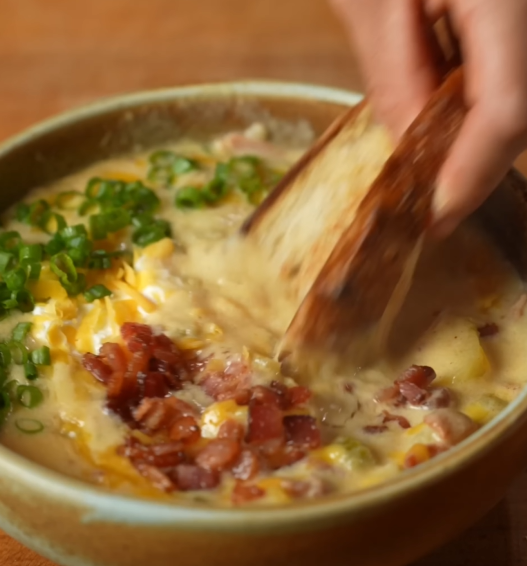
When I first tasted Outback Steakhouse’s famous potato soup, I knew I had to recreate this creamy, bacon-studded masterpiece at home. After countless kitchen experiments and taste tests, I’ve perfected a recipe that captures every bit of that restaurant-quality richness and flavor. This isn’t just any potato soup – it’s the kind that makes you close your eyes and savor every spoonful.
The magic of Outback’s potato soup lies in its perfect balance of textures and flavors. Unlike thin, watery versions you might find elsewhere, this soup achieves that signature thick, velvety consistency that coats your spoon beautifully. The secret? A combination of proper potato selection, careful cooking techniques, and the right blend of seasonings that I’m excited to share with you.
Understanding the Foundation: Key Ingredients
Before diving into the cooking process, let me break down the essential components that make this soup extraordinary:
Russet Potatoes : The backbone of our soup, providing the perfect starch content for natural thickening and that fluffy, creamy texture when cooked properly.
Bacon : Premium thick-cut bacon adds smoky depth and provides those irresistible crispy bits that make each bite special.
Heavy Cream : Creates the luxurious, restaurant-quality richness that sets this soup apart from lighter versions.
Sharp Cheddar Cheese : Adds tangy complexity and helps achieve that golden color reminiscent of the original.
Chicken Stock : Forms the flavorful liquid base, much superior to plain water for building depth.
Butter and Flour Roux : The classic thickening agent that ensures consistent texture without graininess.
Complete Ingredient Breakdown
| Ingredient | Amount | Purpose | Substitution Options |
|---|---|---|---|
| Russet Potatoes | 3 lbs, peeled and cubed | Main base, natural thickener | Yukon Gold (slightly different texture) |
| Thick-cut Bacon | 8 strips | Flavor base, garnish | Turkey bacon, pancetta |
| Heavy Cream | 2 cups | Richness and texture | Half-and-half + butter |
| Sharp Cheddar Cheese | 2 cups, shredded | Flavor and color | Mild cheddar, Colby |
| Chicken Stock | 6 cups | Liquid base | Vegetable stock, bone broth |
| Yellow Onion | 1 large, diced | Aromatic foundation | White onion, shallots |
| Celery | 3 stalks, diced | Texture and flavor | Celery root |
| Butter | 6 tablespoons | Roux base | Margarine, olive oil |
| All-purpose Flour | 6 tablespoons | Thickening agent | Cornstarch (use less) |
| Garlic | 4 cloves, minced | Aromatic depth | Garlic powder (1 tsp) |
| Salt | To taste | Flavor enhancement | Sea salt, kosher salt |
| Black Pepper | 1 teaspoon | Spice and heat | White pepper |
| Paprika | 1 teaspoon | Color and mild heat | Smoked paprika |
| Green Onions | 4 stalks, chopped | Fresh garnish | Chives, parsley |
Step-by-Step Cooking Instructions
Preparation Phase
I always start by preparing all my ingredients before heating anything. This approach, called mise en place, ensures smooth cooking without scrambling for ingredients mid-process.
Step 1: Bacon Preparation Begin by cooking the bacon in a large, heavy-bottomed pot over medium heat. I prefer using a Dutch oven for its excellent heat retention. Cook until the bacon reaches that perfect crispy texture, about 8-10 minutes. Remove the bacon and set aside on paper towels, but keep that rendered fat in the pot – it’s liquid gold for flavor building.
Step 2: Vegetable Foundation Add the diced onions and celery to the bacon fat. Cook for 5-7 minutes until the vegetables soften and become translucent. The bacon fat infuses these aromatics with incredible flavor that forms the soup’s foundation. Add minced garlic during the last minute to prevent burning.
Building the Soup Base
Step 3: Creating the Roux This step requires attention and patience. Add butter to the pot with the vegetables, allowing it to melt completely. Gradually whisk in the flour, creating a paste-like mixture. Cook this roux for 2-3 minutes, stirring constantly to eliminate the raw flour taste. The mixture should be smooth and light golden.
Step 4: Adding Liquid Slowly pour in the chicken stock while whisking continuously. This prevents lumps from forming – a common mistake that can ruin the soup’s texture. Start with just a cup, whisking until smooth, then gradually add the remainder. The mixture will seem thin initially, but don’t worry.
Step 5: Potato Integration Add the cubed potatoes to the pot and bring the mixture to a boil. Once boiling, reduce heat to medium-low and simmer for 20-25 minutes. The potatoes should be fork-tender but not falling apart. Some will naturally break down, contributing to the soup’s thickness.
Achieving Restaurant-Quality Texture
Step 6: Partial Blending Here’s where the magic happens. Using an immersion blender, partially blend the soup directly in the pot. I aim to blend about one-third of the potatoes, leaving plenty of chunks for texture. This technique creates that characteristic thick consistency while maintaining satisfying potato pieces.
Step 7: Cream and Cheese Addition Lower the heat to its lowest setting. Slowly stir in the heavy cream, followed by the shredded cheddar cheese. Add the cheese gradually, stirring constantly to ensure smooth melting. If the heat is too high, the cheese might seize and become grainy.
Nutritional Information and Serving Details
| Nutritional Aspect | Per Serving (1 cup) | Daily Value % |
|---|---|---|
| Calories | 385 | 19% |
| Total Fat | 28g | 36% |
| Saturated Fat | 16g | 80% |
| Cholesterol | 85mg | 28% |
| Sodium | 920mg | 40% |
| Total Carbohydrates | 22g | 8% |
| Dietary Fiber | 2g | 7% |
| Protein | 14g | 28% |
| Vitamin C | 12mg | 13% |
| Calcium | 280mg | 22% |
| Iron | 1.5mg | 8% |
Expert Tips for Perfect Results
Through my years of perfecting this recipe, I’ve learned several crucial techniques that make the difference between good and exceptional potato soup:
Temperature Control: Never let the soup boil once you’ve added the cream and cheese. High heat causes separation and graininess that’s impossible to fix.
Potato Selection: Russet potatoes contain the ideal starch content for natural thickening. Waxy potatoes like red or fingerlings won’t break down properly.
Bacon Quality: Invest in thick-cut, high-quality bacon. The fat renders better, and the flavor is significantly superior to thin, processed varieties.
Seasoning Timing: I add salt gradually throughout the cooking process rather than all at once. This builds layers of flavor more effectively.
Storage Considerations: This soup keeps well in the refrigerator for up to four days. The thickness may increase overnight, so thin with additional stock when reheating.
Serving Suggestions and Accompaniments
| Accompaniment Type | Specific Options | Why It Works |
|---|---|---|
| Bread Options | Crusty sourdough, garlic bread, dinner rolls | Provides textural contrast and helps absorb the rich soup |
| Salad Pairings | Caesar salad, mixed greens with vinaigrette | Cuts through the richness with fresh, acidic elements |
| Protein Additions | Grilled chicken, ham chunks, additional bacon | Transforms the soup into a complete meal |
| Garnish Options | Extra cheese, chives, sour cream, croutons | Adds visual appeal and flavor complexity |
| Vegetable Sides | Steamed broccoli, roasted carrots | Provides nutritional balance and color contrast |
I particularly enjoy serving this soup in bread bowls during colder months. The combination of warm, creamy soup with crusty bread creates the ultimate comfort food experience.
Troubleshooting Common Issues
Problem: Soup Too Thin Mix equal parts cold water and cornstarch to create a slurry. Slowly whisk this into the simmering soup until desired thickness is achieved.
Problem: Lumpy Texture Use an immersion blender to smooth out lumps, or strain the soup through a fine-mesh sieve for ultra-smooth results.
Problem: Cheese Won’t Melt Smoothly The heat is likely too high. Remove from heat, add cheese gradually while stirring, then return to lowest heat setting.
Problem: Too Salty Add a peeled, quartered potato to the pot and simmer for 15 minutes. The potato will absorb excess salt. Remove before serving.
Storage and Reheating Guidelines
Proper storage ensures you can enjoy this soup for days after making it. I transfer cooled soup to airtight containers and refrigerate for up to four days. For longer storage, freeze portions in freezer-safe containers for up to three months.
When reheating, I always use low heat and stir frequently. The soup tends to thicken significantly when cold, so I often add a splash of chicken stock or milk to restore the original consistency. Never microwave on high power, as this can cause separation.
Variations and Customizations
Loaded Baked Potato Soup: Add sour cream swirls and extra bacon bits for the full loaded experience.
Healthier Version: Substitute half the heavy cream with Greek yogurt and use turkey bacon for reduced calories.
Vegetarian Adaptation: Replace bacon with mushrooms for umami depth and use vegetable stock instead of chicken.
Spicy Twist: Add jalapeños with the onions and a dash of hot sauce for heat lovers.
Seasonal Variation: Include corn kernels and diced bell peppers for a summer-inspired version.
Frequently Asked Questions
Can I make this soup ahead of time? Absolutely! I often prepare this soup a day in advance. The flavors actually improve overnight as they meld together. Just remember to thin it slightly when reheating as it will thicken in the refrigerator.
What’s the best way to prevent the soup from curdling? Keep the temperature low once you add dairy products and never let it boil. If you’re concerned about curdling, temper the cream by adding a small amount of hot soup to it before incorporating it into the pot.
Can I freeze leftover potato soup? While you can freeze this soup for up to three months, the texture may change slightly upon thawing. The dairy can separate, but whisking vigorously while reheating usually resolves this issue.
How do I make the soup thicker without flour? Mash more of the potatoes directly in the pot, or blend a larger portion of the soup. You can also add instant potato flakes gradually until you reach desired consistency.
What type of cheese works best? Sharp cheddar provides the most authentic flavor, but I’ve successfully used Gruyère, Monterey Jack, and even smoked cheddar for different flavor profiles.
Is there a dairy-free version? Replace heavy cream with full-fat coconut milk and use nutritional yeast instead of cheese. The flavor will be different but still delicious.
How long does it take to make from start to finish? Plan for about 45 minutes of active cooking time, plus 30 minutes of simmering. Total time is approximately 1 hour and 15 minutes.
Can I use a slow cooker? Yes! Cook vegetables and bacon in a pan first, then transfer everything except cream and cheese to a slow cooker. Cook on low for 4-6 hours, then stir in dairy products during the last 30 minutes.
What’s the secret to getting restaurant-quality taste? The key is building layers of flavor through proper technique – rendering bacon fat, creating a proper roux, and finishing with quality dairy products. Don’t rush any step.
How do I know when the potatoes are done? They should be fork-tender but not mushy. If you can easily pierce them with a fork but they still hold their shape, they’re perfect.
This recipe has become a staple in my kitchen, especially during fall and winter months. There’s something deeply satisfying about creating restaurant-quality soup in your own home, and the aroma that fills your kitchen while it’s cooking is absolutely incredible. Whether you’re serving it as a starter for a dinner party or making it the main event for a cozy family meal, this Outback Steakhouse-inspired potato soup never fails to impress.
The beauty of this recipe lies not just in its delicious results, but in its adaptability. Once you master the basic technique, you can customize it to suit your family’s preferences or dietary needs. I encourage you to make it your own while keeping the fundamental techniques that ensure success every time.