There’s something incredibly inviting about a beautifully arranged fruit board. As someone who has prepared countless fruit displays for everything from casual brunches to elegant dinner parties, I’ve discovered that a thoughtfully crafted fruit board isn’t just delicious—it’s a conversation starter and an edible work of art.
What Makes Fruit Boards So Special
I love creating fruit boards because they celebrate nature’s candy in all its colorful glory. Unlike their savory charcuterie cousins, fruit boards offer a refreshing, health-conscious alternative that appeals to guests of all ages and dietary preferences. They’re versatile, visually stunning, and—best of all—require no cooking!
When I first started making fruit boards, I was intimidated by the gorgeous arrangements I saw online. But with practice, I’ve learned that creating an impressive fruit board is actually quite simple once you understand a few key principles.
Selecting the Perfect Fruits for Your Board
The foundation of any great fruit board is, of course, the fruit itself. I always recommend following these guidelines when selecting fruits:
- Seasonality: Fruits in season will always taste better and cost less
- Ripeness: Choose fruits at their peak ripeness for maximum flavor
- Variety: Include different colors, textures, sizes, and flavor profiles
- Quality: Invest in high-quality fruits—they are the stars of the show
Seasonal Fruit Guide
| Season | Fruits at Their Peak |
|---|---|
| Spring | Strawberries, cherries, apricots, mangoes, pineapples |
| Summer | Watermelon, peaches, nectarines, blueberries, raspberries, blackberries, plums |
| Fall | Apples, pears, grapes, figs, pomegranates, persimmons |
| Winter | Citrus fruits (oranges, mandarins, grapefruit), kiwi, bananas, pears |
I’ve found that choosing at least 5-7 different fruits creates the most visually appealing and satisfying board. When possible, I love incorporating some unusual or exotic fruits to intrigue my guests and create conversation points.
Essential Tools and Accessories
Before diving into assembly, let’s talk about what you’ll need to create your masterpiece:
The Board Itself
I’ve used everything from wooden cutting boards to marble slabs, but these are my favorites:
- Large wooden boards (bamboo, acacia, or walnut)
- Slate or marble boards for an elegant look
- White ceramic platters for a clean, modern aesthetic
Useful Tools
- Sharp knife for clean cutting
- Melon baller for creating perfect spheres
- Small cookie cutters for fun shapes
- Citrus zester for garnish
Accompaniments
While the fruits are the main attraction, these additions elevate your board:
- Small bowls for dips and spreads
- Tiny serving spoons and forks
- Fresh herbs for garnish (mint, basil, rosemary)
- Edible flowers for a special touch
Preparing Your Fruits
Proper preparation is the key to a fruit board that remains fresh and appealing throughout your event. Here’s how I handle different types of fruits:
Berries and Grapes
These delicate fruits need gentle handling:
- Wash berries just before serving (never in advance)
- Remove strawberry stems and quarter larger berries
- Keep grapes on the stem in small bunches for easy grabbing
Stone Fruits and Apples
These fruits benefit from thoughtful cutting:
- Slice peaches, plums, and nectarines into wedges
- Cut apples and pears into thin slices and toss with lemon juice to prevent browning
- Remove pits from cherries if desired (though I often leave them intact for visual appeal)
Melons and Tropical Fruits
These statement fruits can be displayed in various ways:
- Use a melon baller for watermelon, cantaloupe, and honeydew
- Cut pineapple into spears or chunks
- Slice mango into hedgehogs or cubes
- Halve kiwis or slice into rounds
Citrus Fruits
These add wonderful color and freshness:
- Peel and segment oranges and grapefruits
- Slice lemons and limes thinly for garnish
- Consider leaving some small mandarins whole for visual interest
I always make sure to have a mix of whole fruits, sliced fruits, and uniquely cut shapes to create visual interest and make the board easy to eat.
Creating Perfect Fruit Dips
A few well-chosen dips can transform your fruit board from great to extraordinary. My go-to options include:
Honey Yogurt Dip
Simple yet stunning
- 1 cup Greek yogurt
- 2 tablespoons honey
- 1 teaspoon vanilla extract
- Pinch of cinnamon
Chocolate Dipping Sauce
Always a crowd-pleaser
- 1 cup dark or semi-sweet chocolate chips
- 1/2 cup heavy cream
- 1 tablespoon butter
Citrus Honey Mascarpone
Elegant and unexpected
- 8 oz mascarpone cheese, room temperature
- 2 tablespoons honey
- 1 teaspoon orange zest
- 1 tablespoon orange juice
Coconut Cream Dip
Tropical and dairy-free
- 1 can coconut cream, chilled overnight
- 2 tablespoons maple syrup
- 1/2 teaspoon vanilla extract
I typically choose 2-3 dips for variety without overwhelming the board. Small bowls strategically placed around the board make it easy for guests to access the dips.
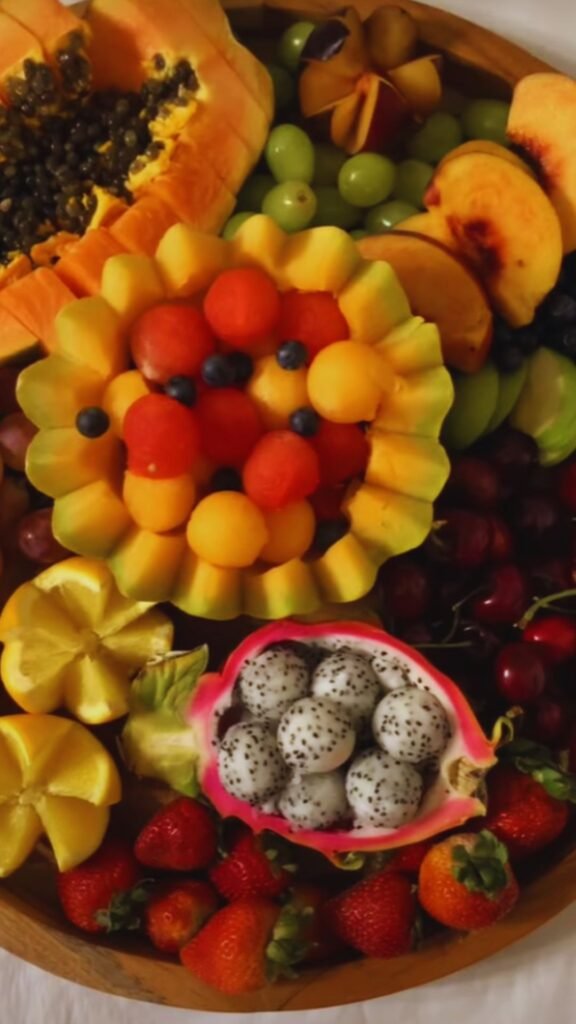
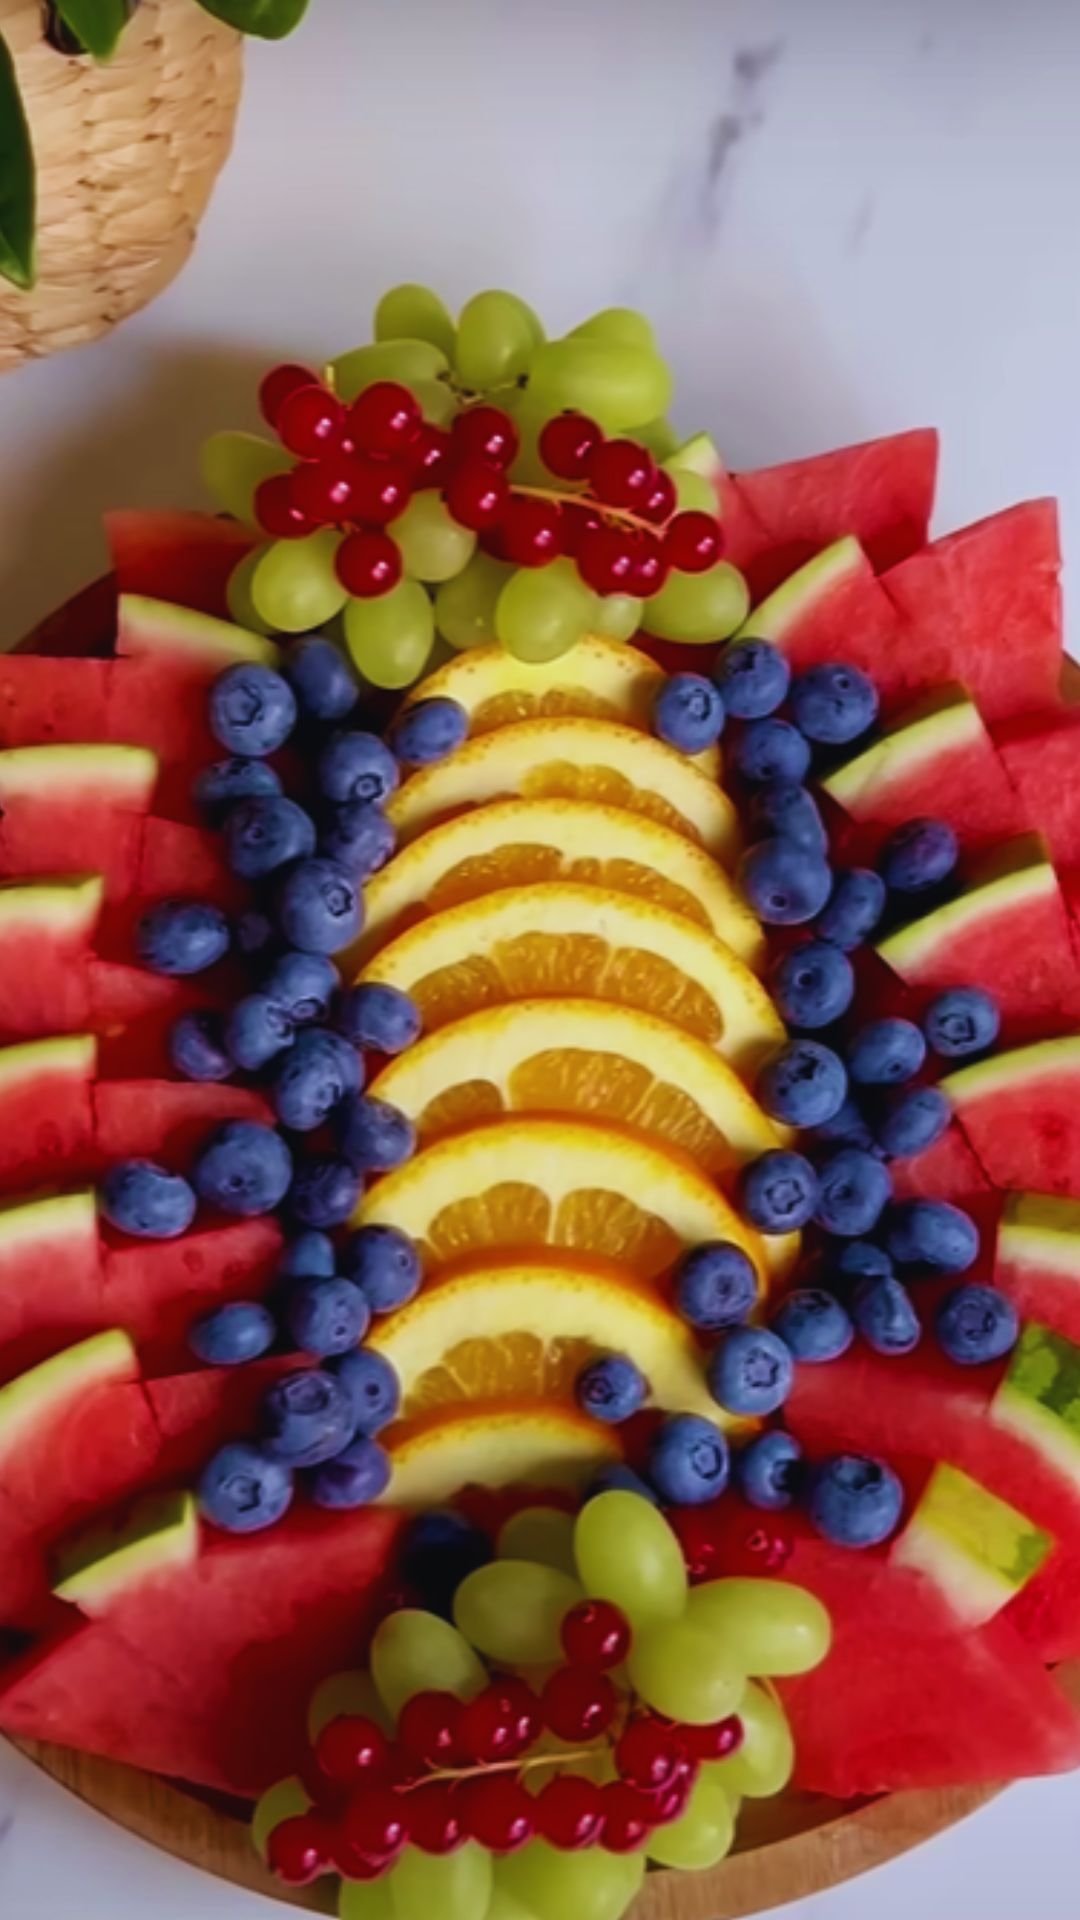
The Art of Arrangement
Now comes the fun part—turning your ingredients into a visual feast! After years of creating fruit boards, I’ve developed a simple system:
Step 1: Place Your Anchors
I start by positioning the largest items first:
- Place dip bowls strategically around the board
- Add any whole fruits like small apples or mandarins
- Position large fruit chunks like watermelon wedges or pineapple spears
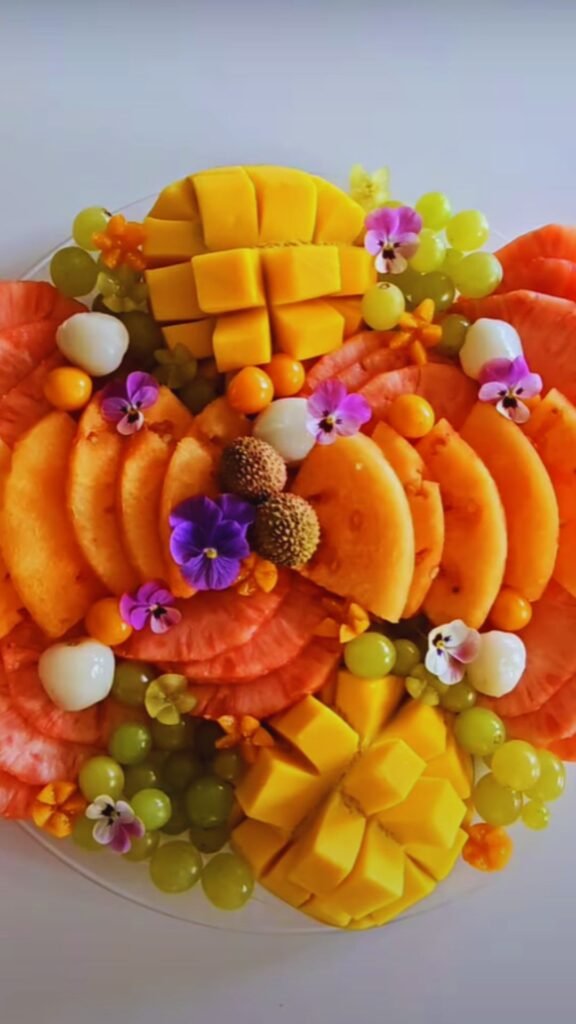
Step 2: Create Color Zones
I love creating sections of color that flow into each other:
- Group similar colors together (all berries, all citrus)
- Then arrange them so complementary colors are adjacent
- Consider the color wheel—opposites like orange and blue (think oranges next to blueberries) create vibrant contrast
Step 3: Fill in the Gaps
No empty spaces should remain:
- Fill smaller spaces with berries, grape bunches, or sliced kiwi
- Tuck fresh herbs like mint sprigs into any remaining gaps
- Add edible flowers for special occasions
Step 4: Add Height and Dimension
A flat board is boring! I create interest by:
- Stacking some fruits higher than others
- Using small bowls at different heights
- Creating fruit “rivers” that wind through the board
- Folding sliced fruits to create waves and movement
Remember, there’s no perfect way to arrange a fruit board. I find that embracing a beautiful chaos leads to the most stunning results!
Advanced Fruit Board Techniques
Once you’ve mastered the basics, try these special touches that I’ve developed over years of fruit board creation:
Themed Fruit Boards
| Theme | Featured Fruits | Special Touches |
|---|---|---|
| Tropical Paradise | Pineapple, mango, papaya, dragon fruit, kiwi, coconut | Palm leaf serving platter, hibiscus flowers, passionfruit dip |
| Mediterranean Summer | Figs, grapes, melon, peaches, cherries | Fresh rosemary sprigs, honey drizzle, ricotta dip |
| Citrus Celebration | Various oranges, grapefruit, lemons, limes, kumquats | Citrus zest garnish, mint leaves, honey-lemon dip |
| Berry Bonanza | All berries: strawberries, blueberries, blackberries, raspberries | Edible flowers, chocolate dip, fresh basil leaves |
| Autumn Harvest | Apples, pears, grapes, figs, persimmons | Cinnamon sticks, maple-spiced dip, sage leaves |
Fruit Roses and Garnishes
Learning to create fruit roses from strawberries, apples, or watermelon adds an impressive decorative element. While it takes practice, the results are worth it! Here’s how I make a simple apple rose:
- Cut apples into very thin half-moon slices
- Soak briefly in lemon water to prevent browning
- Pat dry and arrange in a row, overlapping slightly
- Carefully roll up starting from one end
- Secure with a toothpick if needed
Interactive Elements
I love adding interactive components that encourage guests to engage with the board:
- Chocolate fondue fountain for dipping
- Mini fruit kebab station with bamboo skewers
- “Build your own fruit parfait” section with yogurt and granola
- Honey drizzlers or flavored syrup droppers
Serving Suggestions
The way you present your fruit board can enhance the entire experience. Here are my favorite serving ideas:
Perfect Pairings
These accompaniments complement fruit beautifully:
- Artisanal cheeses (brie, goat cheese, mascarpone)
- Nuts (pistachios, sliced almonds, candied walnuts)
- Edible garnishes (fresh mint, basil, lavender)
- Sweet treats (dark chocolate pieces, honey comb, coconut flakes)
Beverage Companions
I like to serve these drinks alongside my fruit boards:
- Sparkling water with citrus slices
- Iced tea (especially mint or peach varieties)
- Lemonade or fruit-infused water
- Fresh fruit smoothies
- Mocktails with fruit garnishes
Occasion-Specific Touches
| Occasion | Special Elements |
|---|---|
| Brunch | Miniature pancakes or waffles for “dipping” |
| Afternoon Tea | Scones, clotted cream, and fruit preserves |
| Dessert | Chocolate dipping sauce and shortbread cookies |
| Kids’ Party | Cookie-cutter shaped fruits and yogurt dips |
| Elegant Dinner | Gold-dusted fruits and edible flowers |
Storage and Make-Ahead Tips
One challenge with fruit boards is keeping everything fresh. Here’s what I’ve learned:
Prep Timelines
- 1-2 days ahead: Prepare dips and store in sealed containers
- 4-6 hours ahead: Cut melons, pineapple, and citrus fruits; store in containers in the refrigerator
- 1 hour ahead: Arrange non-browning fruits on the board
- Just before serving: Add berries, cut apples, bananas, and any delicate items
Keeping Fruits Fresh
These tricks help maintain freshness:
- Spritz cut fruits that brown (apples, bananas, pears) with lemon juice
- Keep the board refrigerated until about 20 minutes before serving
- For outdoor events, place the board on a larger tray filled with ice
- Cover with damp paper towels if you need to prepare slightly in advance
Seasonal Fruit Board Inspiration
I’ve created a detailed seasonal guide to help you plan the perfect fruit board any time of year:
Spring Renewal Board
Spring is all about fresh beginnings, and these fruits capture that essence:
- Strawberries (the first berries of the season)
- Cherry varieties just coming into season
- Fresh apricots with their delicate sweetness
- Early mangoes
- Pineapple at its peak sweetness
Special touches: Edible spring flowers, yogurt-honey dip with fresh mint, and light lemon curd
Summer Abundance Board
Summer offers the richest variety for spectacular boards:
- Watermelon (try both red and yellow varieties)
- Stone fruits: peaches, nectarines, plums
- Berry medley: blueberries, raspberries, blackberries
- Cherries at their peak sweetness
- Fresh figs when available
Special touches: Fresh basil leaves, whipped ricotta with honey, and edible flower ice cubes in accompanying drinks
Fall Harvest Board
The autumn season brings rich, warming flavors:
- Apple varieties (Honeycrisp, Pink Lady, Granny Smith)
- Pear selection (Bartlett, Bosc, Anjou)
- Concord and Champagne grapes
- Persimmons
- Pomegranate arils
Special touches: Cinnamon-spiced yogurt dip, maple-roasted nuts, and sage leaf garnish
Winter Citrus Board
Winter boards celebrate bright flavors during darker months:
- Citrus variety (blood oranges, cara cara oranges, grapefruits)
- Mandarin and clementine segments
- Kiwi slices
- Pomelo
- Starfruit for visual appeal
Special touches: Rosemary sprigs, cinnamon-honey dip, and sugared cranberries
Dietary Considerations
What I love about fruit boards is their natural inclusivity for most dietary restrictions. Here’s how I ensure everyone can enjoy my creations:
Common Accommodations
| Dietary Need | Accommodations |
|---|---|
| Vegan | Use plant-based dips like coconut whipped cream or dairy-free chocolate |
| Gluten-Free | Naturally gluten-free! Just avoid any cookie or pastry accompaniments containing gluten |
| Keto | Include lower sugar fruits like berries and provide nuts and full-fat dips |
| Paleo | Focus on all fruits, nuts, and use honey as a sweetener in dips |
| Diabetic-Friendly | Emphasize lower glycemic fruits like berries and include protein-rich dips |
| Allergies | Clearly label any dips containing nuts, dairy, or other common allergens |
My Top Fruit Board Mistakes (And How to Fix Them)
Over the years, I’ve made plenty of fruit board blunders. Learn from my mistakes!
- Overcrowding the board Solution: Use a larger board than you think you need or create a pretty overflow platter
- Preparing everything too far in advance Solution: Follow my timeline guide above and add delicate fruits last
- Forgetting to provide serving utensils Solution: Include small forks, toothpicks, and spoons around the board
- Making the dips too thick Solution: Ensure dips are the perfect consistency for fruit dipping—not too runny, not too stiff
- Ignoring temperature considerations Solution: Remember that fruit tastes best when not ice-cold; let it sit at room temperature briefly before serving
Frequently Asked Questions
What’s the difference between a fruit board and a fruit platter? While the terms are sometimes used interchangeably, I find that fruit boards typically feature more artistic arrangements on a flat surface like a wooden board, while platters are often more simply arranged on a dish with raised edges. Boards also frequently include accompaniments like dips, nuts, and other nibbles.
How much fruit should I buy for a group? For a main attraction fruit board, I calculate about 4-6 ounces of fruit per person. For a side or dessert board, 2-3 ounces per person is usually sufficient. When in doubt, buy extra—leftover fruit can easily be used in smoothies or breakfast the next day!
What are the best tools for cutting fruit for a board? A sharp chef’s knife is essential for most cutting tasks. I also rely heavily on a good paring knife for detailed work, a melon baller for creating perfect spheres, and small cookie cutters for fun shapes that kids especially love.
How can I prevent cut apples and bananas from browning? My foolproof method is to toss cut pieces in a mixture of one tablespoon of lemon juice mixed with one cup of water. This prevents oxidation without making the fruit taste too lemony. For bananas, I often slice them just before serving.
What’s the best way to transport a fruit board to another location? I recommend prepping all components and transporting them separately in containers. Bring your board, bowls, and tools, then assemble on location. If you must transport an already-arranged board, wrap it carefully with plastic wrap and keep it level during transport.
Can I make a budget-friendly fruit board that still looks impressive? Absolutely! Focus on seasonal fruits which are always more affordable, and create visual impact through thoughtful arrangement rather than exotic choices. Smaller cut pieces can also make your board look fuller while using less fruit.
Final Thoughts
Creating a beautiful fruit board is both an art and a joy. There’s something deeply satisfying about arranging nature’s colorful bounty into an edible display that brings people together. I find that no matter how simple or elaborate my fruit boards are, they always elicit smiles and appreciation.
The beauty of fruit boards lies in their flexibility—they can be casual or elegant, simple or complex, budget-friendly or luxurious. By following the guidelines I’ve shared from my years of experience, you’ll be well on your way to creating fruit boards that not only nourish the body but feed the soul with their beauty.
Remember that the most important ingredient is your own creative touch. Trust your instincts, play with colors and textures, and most importantly, have fun! Your enthusiasm will shine through in your creation, making your fruit board truly special.
Q&A Section
What fruits should never be included on a fruit board? While almost any fruit can work, I avoid very soft fruits like overripe bananas or extremely juicy fruits like cut watermelon without proper containment, as they can make the board soggy. I’m also cautious with fruits that brown quickly unless I’m adding them right before serving.
How far in advance can I prepare a fruit board? For the freshest presentation, most of the actual arrangement should happen within an hour of serving. However, you can prep components like dips and cut certain sturdy fruits (like melons and pineapple) up to a day ahead. The complete assembly timeline I shared in the article is my tried-and-true method.
What’s the best way to incorporate chocolate with a fruit board? I love including a rich chocolate dipping sauce in a small warmed bowl. For something simpler, dark chocolate chunks scattered among the fruit create delightful little treasures. For special occasions, chocolate-dipped strawberries arranged along one edge of the board make a stunning presentation.
Are there any unusual fruits that work particularly well on fruit boards? Absolutely! Star fruit (carambola) creates beautiful star-shaped slices that always impress. Dragon fruit adds dramatic black-and-white contrast when sliced. Physalis (cape gooseberries) with their paper-like husks pulled back make charming natural “packages.” Even lychee, with their bumpy red exterior and translucent flesh, can add interesting texture.
Do you have tips for making a fruit board for a very large group? For very large gatherings, I actually prefer creating multiple smaller boards rather than one enormous display. This allows for better traffic flow as guests can access different boards from various points around the table. I also recommend having prepared backup fruit ready in the refrigerator to refresh the boards as needed throughout the event.
What’s your secret to making a fruit board look professionally arranged? My number one secret is varying the cutting techniques—having the same fruit cut in different ways adds tremendous visual interest. For example, strawberries can appear whole, halved, sliced, and fanned. I also pay attention to height variation and create movement through curved arrangements rather than straight lines.