
Have you ever dreamed of combining two beloved comfort foods into one irresistible bite-sized treat? Well, dream no more! As someone who’s spent countless hours perfecting the art of turning classic dishes into crowd-pleasing appetizers, I’m thrilled to share my recipe for Crispy Fried Bacon Mac and Cheese Bites. These golden, crunchy morsels packed with creamy mac and cheese and savory bacon will have your guests begging for the recipe.
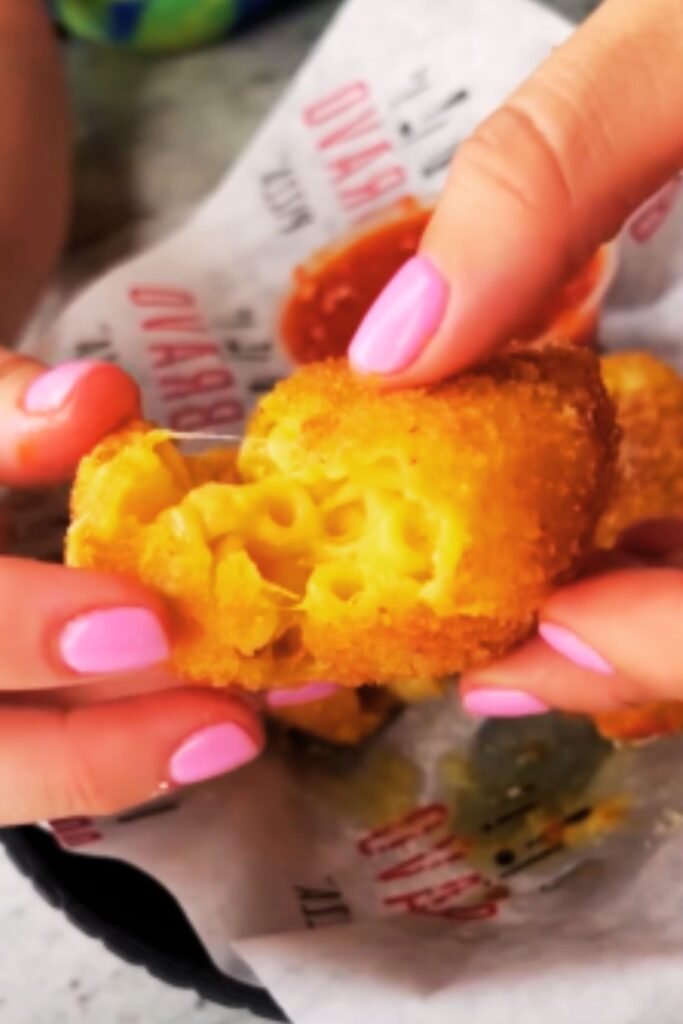
I first created these addictive little bites for a neighborhood potluck five years ago, and they disappeared faster than any dish I’ve ever served. Since then, they’ve become my signature party food, requested at every gathering. The contrast between the crispy outer shell and the gooey, bacon-studded mac and cheese inside creates an explosion of flavor and texture that’s simply impossible to resist.
Whether you’re hosting a game day party, need an impressive appetizer for a holiday gathering, or just want to treat your family to something special, these Fried Bacon Mac and Cheese Bites will not disappoint. Let me walk you through creating this crowd-pleasing dish step by step.
What Makes These Mac and Cheese Bites Special?
What sets these mac and cheese bites apart from others you might have tried is the combination of techniques and ingredients that create layers of flavor and texture:
- Homemade mac and cheese base: No boxed mix here! We’re creating a rich, creamy sauce from scratch
- Crispy bacon pieces: Because everything is better with bacon
- Triple coating process: The secret to that perfectly crispy exterior that doesn’t fall apart
- Blend of cheeses: Using multiple varieties gives depth of flavor you can’t get from a single cheese
- Make-ahead friendly: Prepare in advance and fry just before serving for maximum convenience
Essential Ingredients
For the Mac and Cheese Base:
- 8 oz elbow macaroni (about 2 cups uncooked)
- 3 tablespoons unsalted butter
- 3 tablespoons all-purpose flour
- 2 cups whole milk, warmed
- 1 cup sharp cheddar cheese, freshly grated
- 1 cup Gruyère cheese, freshly grated (or substitute with more cheddar if unavailable)
- ½ cup Parmesan cheese, freshly grated
- ½ teaspoon mustard powder
- ¼ teaspoon garlic powder
- ¼ teaspoon onion powder
- ⅛ teaspoon cayenne pepper (optional)
- 8 slices bacon, cooked crispy and crumbled
- Salt and freshly ground black pepper to taste
For the Coating:
- 1 cup all-purpose flour
- 1 tablespoon garlic powder
- 1 tablespoon onion powder
- 1 teaspoon paprika
- 1 teaspoon salt
- ½ teaspoon freshly ground black pepper
- 3 large eggs, beaten
- 2 cups panko breadcrumbs
- ½ cup regular breadcrumbs
- 2 tablespoons fresh parsley, finely chopped
- Vegetable or canola oil for frying
For the Dipping Sauce (Optional):
- ½ cup sour cream
- 2 tablespoons fresh chives, finely chopped
- 1 clove garlic, minced
- 1 teaspoon lemon juice
- Salt and pepper to taste
Kitchen Equipment You’ll Need
Before diving into the cooking process, make sure you have these essential tools on hand:
- Large pot for cooking pasta
- Medium saucepan for the cheese sauce
- Large skillet for cooking bacon
- 8×8-inch baking dish or similar
- Mixing bowls of various sizes
- Box grater for cheeses
- Measuring cups and spoons
- Whisk
- Wooden spoon or silicone spatula
- Slotted spoon or spider strainer
- Deep-fry thermometer
- Heavy-bottomed Dutch oven or deep fryer
- Paper towels
- Baking sheet lined with parchment paper
- Ice cream scoop or cookie scoop (optional but helpful)
Step-by-Step Instructions
Preparing the Mac and Cheese Base
- Cook the elbow macaroni in a large pot of salted boiling water until al dente, about 1-2 minutes less than package directions. Drain well and set aside.
- Meanwhile, cook the bacon in a large skillet over medium heat until crispy. Remove to a paper towel-lined plate, let cool, then crumble into small pieces. Save 1 tablespoon of bacon fat.
- In a medium saucepan, melt the butter and reserved bacon fat over medium heat. Add the flour and whisk continuously for 1-2 minutes to create a roux, being careful not to let it brown.
- Gradually whisk in the warm milk, stirring constantly to prevent lumps. Continue cooking, stirring frequently, until the mixture thickens enough to coat the back of a spoon, about 5-7 minutes.
- Reduce heat to low and add the grated cheeses one handful at a time, stirring until completely melted before adding more.
- Stir in the mustard powder, garlic powder, onion powder, and cayenne pepper (if using). Season with salt and black pepper to taste.
- Remove from heat and fold in the cooked pasta and crumbled bacon until everything is evenly coated.
- Transfer the mixture to a greased 8×8-inch baking dish, spreading it out evenly. Cover with plastic wrap pressed directly onto the surface to prevent a skin from forming.
- Refrigerate for at least 2 hours or overnight until completely chilled and firm. This step is crucial for being able to form the bites.
Forming and Coating the Bites
- Once the mac and cheese mixture is thoroughly chilled and set, remove from the refrigerator.
- Line a baking sheet with parchment paper.
- Set up your breading station with three shallow bowls:
- Bowl 1: Combine the flour, garlic powder, onion powder, paprika, salt, and pepper
- Bowl 2: Beat the eggs until smooth
- Bowl 3: Mix the panko breadcrumbs, regular breadcrumbs, and chopped parsley
- Using an ice cream scoop or your hands, scoop out approximately 2 tablespoons of the mac and cheese mixture and form into 1½-inch balls. Place them on the lined baking sheet.
- Working with a few balls at a time (keeping the rest refrigerated), coat each ball in the seasoned flour, shaking off excess.
- Dip into the beaten eggs, allowing any excess to drip off.
- Roll in the breadcrumb mixture, pressing gently to ensure the crumbs adhere.
- For an extra-crispy coating, dip the breaded balls back into the egg mixture and then into the breadcrumbs for a second coat.
- Place the coated mac and cheese balls back on the baking sheet. Once all balls are coated, refrigerate for at least 30 minutes to help them hold their shape during frying.
Frying the Mac and Cheese Bites
- In a Dutch oven or heavy-bottomed pot, heat 2-3 inches of oil to 350°F (175°C). Use a deep-fry thermometer to monitor the temperature.
- Working in batches of 4-5 bites at a time (to avoid overcrowding and dropping the oil temperature), carefully lower the mac and cheese balls into the hot oil.
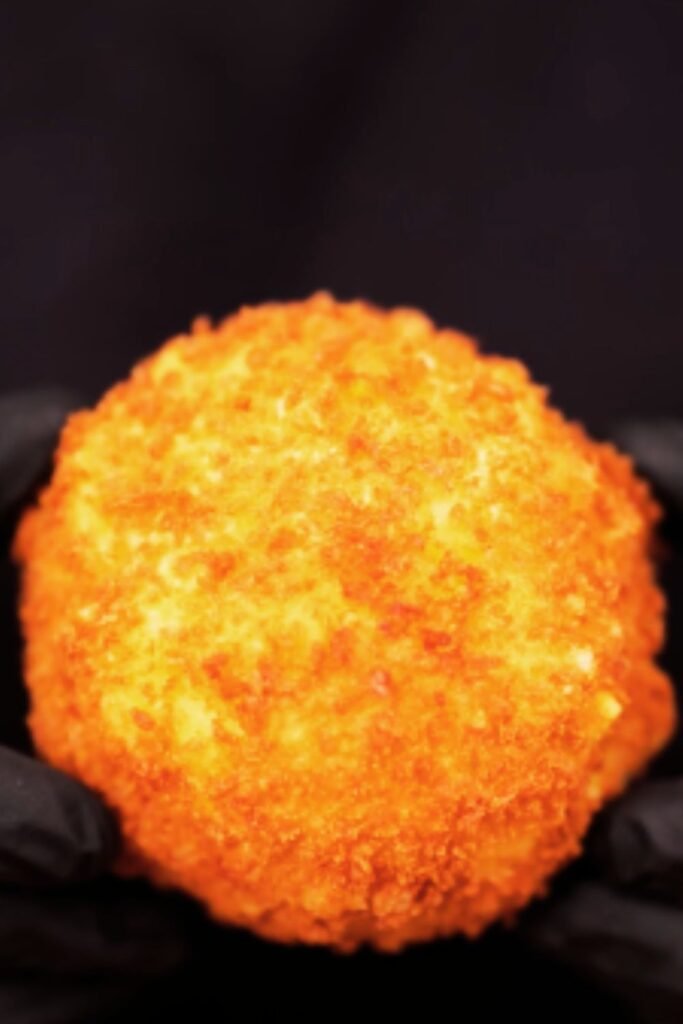
- Fry until golden brown and crispy on all sides, about 2-3 minutes, turning occasionally with a slotted spoon.
- Remove with a slotted spoon or spider strainer and transfer to a paper towel-lined plate to drain excess oil.
- Allow to cool for 2-3 minutes before serving (the inside will be extremely hot).
For the Optional Dipping Sauce
- In a small bowl, combine all sauce ingredients and mix well.
- Refrigerate until ready to serve with the fried mac and cheese bites.
Pro Tips for Perfect Mac and Cheese Bites
After making these countless times, I’ve discovered several tricks that make a huge difference in the final result:
- Use freshly grated cheese: Pre-shredded cheese contains anti-caking agents that can make your sauce grainy. Taking the extra time to grate your own cheese results in a much smoother, creamier sauce.
- Thoroughly chill the mac and cheese: Don’t rush this step! The longer you chill the mixture, the firmer it becomes and the easier it will be to form into balls that hold their shape during frying.
- Double-coat for extra crispiness: While a single coating works fine, double-coating the bites gives them an extra-crispy exterior that provides a wonderful textural contrast to the creamy interior.
- Monitor oil temperature closely: If the oil is too hot, the outside will burn before the inside warms through. If it’s too cool, the bites will absorb too much oil and become greasy. Aim for a consistent 350°F.
- Serve immediately: These bites are at their absolute best when served hot and fresh from the fryer. The contrast between the crispy exterior and gooey interior is most pronounced right after cooking.
- Make the components ahead of time: You can prepare the mac and cheese base up to two days ahead and keep it refrigerated. You can even form and coat the balls the day before and refrigerate them until ready to fry.
Nutritional Information
While these are definitely an indulgent treat, it’s helpful to know what you’re consuming. Here’s the approximate nutritional breakdown per serving (3 bites):
| Nutrient | Amount |
|---|---|
| Calories | 425 |
| Total Fat | 25g |
| Saturated Fat | 12g |
| Cholesterol | 115mg |
| Sodium | 680mg |
| Total Carbohydrates | 32g |
| Dietary Fiber | 1.5g |
| Sugars | 3g |
| Protein | 18g |
Variations to Try

One of the things I love most about this recipe is how versatile it is. Here are some of my favorite variations:
Jalapeño Popper Mac and Cheese Bites
Add 3-4 finely diced jalapeños (seeds removed for less heat) to your mac and cheese mixture, along with 4 oz of cream cheese. The spicy kick works wonderfully with the creamy cheese.
Buffalo Chicken Mac and Cheese Bites
Mix in 1 cup of shredded rotisserie chicken tossed with 2-3 tablespoons of buffalo sauce. Serve with blue cheese dressing instead of the sour cream dip.
Truffle Mushroom Mac and Cheese Bites
Sauté 8 oz of finely chopped mushrooms until golden brown and fold into the mac and cheese along with 1-2 teaspoons of truffle oil. This creates an elegant appetizer perfect for upscale gatherings.
Mediterranean Mac and Cheese Bites
Add ¼ cup of sun-dried tomatoes, ¼ cup of chopped Kalamata olives, and 1 tablespoon of fresh oregano to the base. Use feta as one of your cheeses for a Mediterranean twist.
Lobster Mac and Cheese Bites
For a luxurious version, fold in 8 oz of cooked, chopped lobster meat and substitute Gruyère with fontina cheese. These are perfect for special occasions.
Serving Suggestions
These bites are versatile and can be presented in various ways depending on the occasion:
- For casual gatherings: Serve in a large bowl lined with parchment paper with dipping sauce on the side
- For elegant events: Arrange on a platter with small picks inserted into each bite for easy handling
- As a main dish: Pair with a simple green salad dressed with vinaigrette for a satisfying meal
- For kids’ parties: Serve alongside veggie sticks with ranch dip for a fun finger-food combination
- For brunch: Offer as a savory option alongside sweet treats for a balanced spread
Storing and Reheating Leftovers
While these bites are best enjoyed fresh, leftovers can still be delicious if properly stored and reheated:
Storage:
- Refrigerate cooled leftover fried bites in an airtight container for up to 3 days.
- Unfried, breaded bites can be frozen on a baking sheet until solid, then transferred to a freezer bag and stored for up to 1 month.
Reheating:
- Oven method (best): Preheat oven to 375°F. Place bites on a baking sheet and heat for 8-10 minutes until crispy and warmed through.
- Air fryer method: Heat at 350°F for 3-4 minutes until crispy.
- Microwave (last resort): While this will lose the crispiness, you can microwave for 30-45 seconds if you’re in a hurry.
Frequently Asked Questions
Q: Can I bake these instead of frying them?
A: Absolutely! While the fried version has the ultimate crispy exterior, a baked version can be delicious and healthier. Preheat your oven to 425°F, place the breaded bites on a parchment-lined baking sheet, spray or brush lightly with oil, and bake for 15-20 minutes until golden brown, turning halfway through.
Q: Why did my mac and cheese bites fall apart when frying?
A: This usually happens when the mac and cheese mixture wasn’t chilled long enough or the oil temperature was too low. Make sure to refrigerate the mac and cheese for at least 2 hours before forming, and then chill the formed bites again before frying. Also, keep your oil at a consistent 350°F.
Q: Can I make these vegetarian?
A: Definitely! Simply omit the bacon and use 4 tablespoons of butter instead of the 3 tablespoons plus bacon fat. You might want to add a bit more seasoning to compensate for the flavor the bacon would have provided.
Q: My breadcrumb coating fell off during frying. What went wrong?
A: This can happen if the egg wash doesn’t completely cover the flour coating or if the breadcrumbs aren’t pressed on firmly enough. Make sure each bite is thoroughly coated at each step of the breading process. Also, the double-coating method can help create a more secure crust.
Q: How far in advance can I prepare these for a party?
A: You can make the mac and cheese base up to 2 days ahead and refrigerate it. You can form and bread the bites up to 24 hours in advance and keep them refrigerated. For the best results, fry them shortly before serving, but if necessary, you can fry them up to 2 hours ahead and keep them warm in a 200°F oven.
Q: Are there any non-dairy alternatives for this recipe?
A: While traditional mac and cheese relies heavily on dairy, you can create a dairy-free version using plant-based butter, unsweetened plant milk, and dairy-free cheese alternatives. Just be aware that the texture and binding properties will be different, so you may need to adjust the chilling time and handle the bites more carefully.
Q: What’s the best oil for frying these bites?
A: I recommend vegetable oil, canola oil, or peanut oil for their neutral flavor and high smoke points. Avoid olive oil, which has a lower smoke point and a distinctive flavor that may compete with the mac and cheese.
Why You’ll Love This Recipe
There’s something magical about transforming a beloved comfort food into an elegant, bite-sized appetizer. These Fried Bacon Mac and Cheese Bites tick all the boxes:
- They’re the perfect party food – easy to eat while mingling
- The make-ahead components make entertaining less stressful
- They appeal to both kids and adults alike
- The combination of textures – crispy exterior and creamy interior – is irresistible
- They’re customizable to suit various taste preferences and dietary needs
I first made these for my nephew’s graduation party, and years later, people still talk about them. There’s something about the nostalgic flavor of mac and cheese combined with the indulgence of fried food and the savory punch of bacon that creates an unforgettable culinary experience.
Whether you’re an experienced cook or trying something new, these bites are guaranteed to impress. The step-by-step instructions make the process manageable, and the results are well worth the effort. Trust me, make these once, and they’ll become your signature dish too!
So go ahead – treat yourself and your loved ones to these indulgent Fried Bacon Mac and Cheese Bites. Your reputation as the ultimate host may just depend on it!

