
Have you ever wanted to serve a dessert that makes your guests gasp with delight? Something that combines the comforting warmth of cake with the refreshing chill of ice cream, all wrapped in a cloud of toasted meringue? Look no further than these Baked Alaska Mini Ice Cream Cakes. I’ve been making these showstoppers for years, and they never fail to impress at dinner parties, celebrations, or whenever I want to add a touch of elegance to a meal.
What makes these mini cakes so special isn’t just their impressive appearance—it’s the magical contrast of temperatures. The outside is warm and toasty, while the inside remains perfectly frozen. It seems impossible, but it works because meringue is an excellent insulator. I’ll walk you through creating a set of 12 perfect mini Baked Alaskas that will have everyone thinking you’re a professional pastry chef.
The History Behind Baked Alaska
Before diving into the recipe, I want to share a bit about this fascinating dessert’s origins. Baked Alaska wasn’t created in Alaska at all! It was actually invented in 1867 by a chef at Delmonico’s restaurant in New York City to celebrate the United States’ purchase of Alaska from Russia. The white meringue exterior was meant to represent the snowy landscapes of America’s new territory.
The dessert was originally called “Alaska, Florida” to highlight the contrast between the cold ice cream and the warm meringue. Over time, it was simplified to “Baked Alaska,” and it became a symbol of luxury dining in the early 20th century.
By creating mini versions, I’ve made this classic dessert more approachable and perfect for serving a crowd without the stress of slicing a large, melting creation at the table.
Essential Ingredients for Mini Baked Alaskas
Creating these miniature masterpieces requires quality ingredients. Here’s what you’ll need:
| Ingredient | Quantity | Notes |
|---|---|---|
| Vanilla pound cake | 1 (16 oz) loaf | Store-bought works fine, but homemade is even better |
| Premium vanilla ice cream | 1.5 quarts | Ensure it’s very firm; premium brands have less air |
| Egg whites | 8 large | Room temperature for better volume |
| Granulated sugar | 1 cup | For the meringue |
| Cream of tartar | 1/2 teaspoon | Stabilizes the meringue |
| Pure vanilla extract | 1 teaspoon | For flavoring the meringue |
| Salt | 1/8 teaspoon | Enhances sweetness without adding sugar |
| Fresh berries | 2 cups | For garnish (strawberries, raspberries, blueberries) |
| Fresh mint leaves | 1 bunch | For garnish |
| Confectioners’ sugar | 3 tablespoons | For dusting |
Essential Equipment Needed
Having the right tools makes this recipe much easier to execute:
- 3-inch round cookie cutter
- Ice cream scoop with release mechanism (2-inch diameter)
- Stand mixer or hand mixer with whisk attachment
- Piping bags
- Star piping tip (large)
- Kitchen torch (preferred) or oven broiler
- Digital kitchen thermometer
- Silicone baking mat or parchment paper
- Baking sheets that fit in your freezer
- Offset spatula
- Serving platter with space for 12 mini cakes

Step-by-Step Instructions
Now, let’s break down the process into manageable steps:
Day 1: Prepare the Base and Ice Cream
- Line a baking sheet with parchment paper or a silicone mat.
- Use the cookie cutter to cut 12 rounds from the pound cake. Each should be about 3/4-inch thick.
- Arrange the cake rounds on the prepared baking sheet, leaving space between each.
- Let your ice cream soften slightly for 5-10 minutes.
- Using the ice cream scoop, place one perfectly rounded scoop of ice cream centered on top of each cake round.
- Immediately place the sheet in the freezer and freeze for at least 4 hours or, ideally, overnight.
Day 2: Make the Meringue and Assemble
- Remove the frozen cake and ice cream bases from the freezer.
- In a very clean, dry stand mixer bowl, combine the egg whites, cream of tartar, and salt.
- Beat on medium speed until foamy.
- Gradually add the granulated sugar, 1 tablespoon at a time, while continuing to beat.
- Increase speed to high and continue beating until stiff, glossy peaks form (about 5-7 minutes).
- Add the vanilla extract during the last minute of beating.
- Test the meringue by rubbing a small amount between your fingers—it should feel smooth, not gritty.
- Transfer the meringue to a piping bag fitted with a large star tip.
- Working quickly, pipe the meringue completely around one ice cream-topped cake round, fully encasing the ice cream and cake. Start at the bottom and work your way up in a spiral pattern.
- Repeat with the remaining cakes, returning any waiting cakes to the freezer to prevent melting.
- Once all cakes are covered with meringue, return them to the freezer for at least 1 hour.
Toasting the Meringue
You have two options for toasting the meringue:
Using a Kitchen Torch (Preferred Method)
- Just before serving, remove cakes from freezer.
- Place them on a heat-proof surface.
- Light your kitchen torch and adjust to a medium flame.
- Hold the torch 4-5 inches from the meringue and move it continuously in small circles.
- Toast the meringue until it reaches a golden brown color.
- Let the cakes sit for 1-2 minutes before serving.
Using an Oven Broiler
- Preheat your broiler to high.
- Arrange frozen meringue-covered cakes on a baking sheet.
- Place under the broiler for 30-60 seconds, watching constantly.
- Remove as soon as the meringue begins to brown.
- Let stand for 1-2 minutes before serving.
Advanced Techniques for Perfect Results
Over the years, I’ve discovered several techniques that elevate these mini Baked Alaskas from good to exceptional:
Temperature Management
The secret to successful Baked Alaska is extreme temperature control:
- Freeze the cake and ice cream combination overnight or for at least 6 hours.
- Work in a cool kitchen if possible.
- Keep the assembled cakes in the freezer until the very last moment before toasting.
- Chill your serving platter in the refrigerator before plating.
Meringue Mastery
The meringue is your insulating layer, so it needs to be perfect:
- Make sure your mixing bowl and beaters are absolutely clean and free from any grease.
- Use room temperature egg whites for maximum volume.
- Add the sugar very gradually to ensure it dissolves completely.
- Beat until the meringue holds stiff peaks and has a glossy appearance.
- Apply the meringue in a thick, even layer, making sure there are no gaps that could allow heat to reach the ice cream.
Flavor Variations to Try
While the classic version is divine, I love experimenting with different flavor combinations:
| Cake Base | Ice Cream Flavor | Meringue Addition | Garnish |
|---|---|---|---|
| Chocolate pound cake | Mint chocolate chip | 1/4 tsp mint extract | Chocolate shavings |
| Lemon pound cake | Raspberry sorbet | 1 tsp lemon zest | Fresh raspberries |
| Almond pound cake | Coffee ice cream | 1/4 tsp almond extract | Sliced almonds |
| Gingerbread | Vanilla bean | 1/4 tsp cinnamon | Candied ginger |
| Red velvet | Cream cheese ice cream | Standard vanilla | Red berries |
| Coconut cake | Mango sorbet | 1/4 tsp coconut extract | Toasted coconut |
Make-Ahead Tips and Storage
These mini Baked Alaskas are ideal for entertaining because much of the work can be done in advance:
- The cake and ice cream bases can be prepared up to 2 weeks ahead and kept frozen in an airtight container.
- The completed cakes with meringue (untoasted) can be made up to 3 days ahead and kept frozen.
- For longer storage, wrap each assembled but untoasted cake individually in plastic wrap, then in foil, and freeze for up to 1 month.
- Always toast the meringue just before serving.
Important: Once toasted, these treats must be served immediately—the contrast of warm meringue and frozen ice cream is what makes them special.
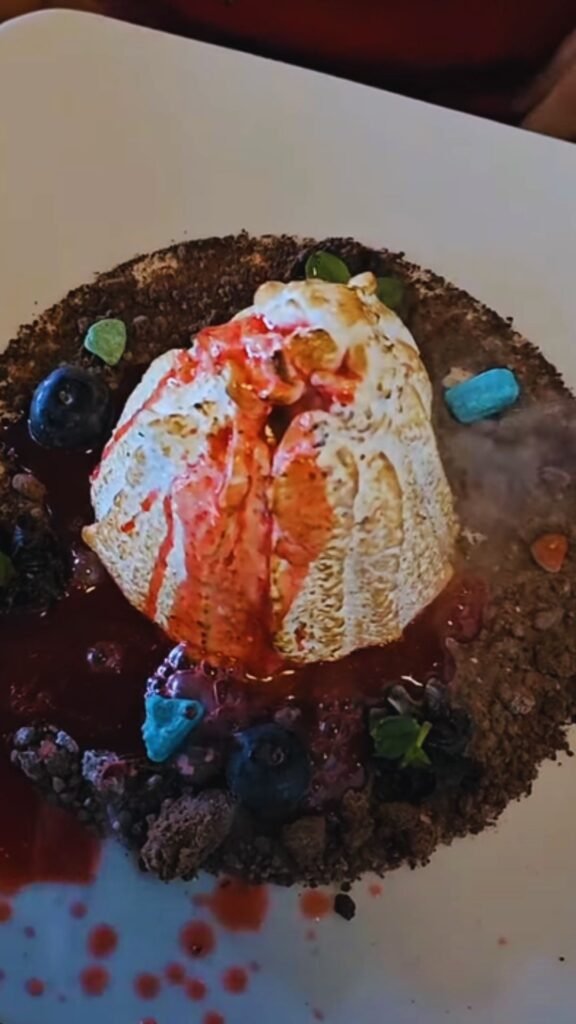
Serving Suggestions
Presentation is key with these impressive little desserts:
- Place each Baked Alaska on a small pool of fruit coulis (raspberry, mango, or mixed berry work beautifully).
- Garnish with fresh berries and a small sprig of mint.
- Dust lightly with confectioners’ sugar for a snow-capped effect.
- Serve on chilled plates to slow the inevitable melting.
- Accompany with a small glass of iced tea or a hot espresso for a delightful temperature contrast.
For a non-alcoholic pairing, I recommend a sparkling water with a splash of elderflower cordial or a bright citrus-infused iced tea.

Troubleshooting Common Issues
Even experienced bakers can encounter challenges with this complex dessert. Here are solutions to common problems:
Meringue Not Holding Peaks
- Ensure your bowl and beaters are completely clean and free from any grease.
- Use fresh eggs at room temperature.
- Add cream of tartar early in the beating process.
- Make sure you’re adding the sugar gradually, not all at once.
Ice Cream Melting Too Quickly
- Your ice cream or bases weren’t frozen solid enough before adding meringue.
- The meringue layer may be too thin or have gaps.
- The kitchen may be too warm—try working in batches, keeping most cakes in the freezer.
- Work faster during the meringue application step.
Meringue Sliding Off
- The ice cream surface may have a thin layer of frost or moisture.
- Blot the ice cream gently with paper towels before applying meringue.
- Make sure your meringue is stiff enough before piping.
Uneven Browning
- If using a torch, move it continuously in small circles.
- If using a broiler, rotate the baking sheet halfway through browning.
- Keep a close eye on the cakes during browning—they can go from perfect to burnt in seconds.
Nutritional Information
For those who are calorie-conscious but still want to indulge, here’s the approximate nutritional breakdown per mini Baked Alaska:
| Nutrient | Amount |
|---|---|
| Calories | 320 |
| Total Fat | 16g |
| Saturated Fat | 9g |
| Cholesterol | 95mg |
| Sodium | 180mg |
| Total Carbohydrates | 40g |
| Dietary Fiber | 0.5g |
| Sugars | 32g |
| Protein | 5g |
You can reduce the calorie count by using lighter ice cream varieties and reducing the sugar in the meringue slightly, though this may affect the texture.
Why These Mini Baked Alaskas Are Worth the Effort
I won’t pretend these are a quick, throw-together dessert. They require planning and attention to detail. But I can promise you this: the moment your guests cut into these little masterpieces and experience the contrast of warm, toasty meringue giving way to cold, creamy ice cream and tender cake, they’ll be absolutely amazed.
What makes these mini versions so perfect is that they solve the serving dilemma of traditional Baked Alaska. There’s no tableside cutting and serving of a rapidly melting dessert—each guest gets their own perfect individual portion with all the drama intact.
Plus, the mini size allows for more creativity with flavors. You can create an assortment of different cake and ice cream combinations to please everyone at your table.
Frequently Asked Questions
Q: Can I make these without a kitchen torch?
Yes, you can use your oven’s broiler setting. Place the frozen, meringue-covered cakes on a baking sheet and broil for 30-60 seconds, watching constantly. Remove as soon as the meringue begins to brown.
Q: Why didn’t my meringue whip up properly?
The most common culprits are fat contamination (even a tiny bit of egg yolk can prevent whites from whipping) or using cold egg whites. Make sure your mixing bowl and beaters are squeaky clean, and bring your egg whites to room temperature before beginning.
Q: Can I use a different type of cake for the base?
Absolutely! Just make sure whatever cake you choose is relatively dense and can hold up to the ice cream. Genoise, sponge cake, or brownies all work well. Avoid very moist or delicate cakes that might dissolve under the ice cream.
Q: How far in advance can I make these?
You can prepare everything up to the toasting step up to 3 days in advance. Store the assembled but untoasted cakes in the freezer, well-covered. Always toast the meringue just before serving.
Q: My ice cream melted before I could finish the assembly. What went wrong?
Working quickly is essential. If your kitchen is warm, work with just a few cakes at a time, keeping the rest in the freezer until you’re ready for them. Also, make sure your ice cream is very firmly frozen before you begin.
Q: Can I make these mini Baked Alaskas without dairy?
Yes! Use a dairy-free pound cake and your favorite non-dairy ice cream alternative. The meringue is naturally dairy-free.
Q: What can I use instead of a piping bag for the meringue?
In a pinch, you can use a zip-top plastic bag with the corner snipped off, or simply spoon the meringue over the cakes and create texture with the back of a spoon or an offset spatula.
Q: Why does my meringue weep or slide off the ice cream?
This usually happens if your meringue is underbeaten or if the sugar hasn’t fully dissolved. Make sure to beat until stiff peaks form and the meringue feels smooth, not gritty, between your fingers.
Q: Can I refreeze the desserts if I have leftovers?
Once the meringue has been toasted, these are best enjoyed immediately. The texture of the meringue will deteriorate if refrozen. If absolutely necessary, you can refreeze untoasted portions.
Final Thoughts
Creating these Mini Baked Alaska Ice Cream Cakes has always felt like performing a bit of culinary magic to me. There’s something truly special about serving a dessert that seems to defy the laws of physics—warm on the outside, frozen on the inside.
While they do require some planning and technical skill, the wow factor is absolutely worth it. I’ve seen the looks of wonder on my guests’ faces too many times to count, and that moment of delight when the fork breaks through the toasty meringue into the still-frozen ice cream is simply priceless.
So the next time you want to create a memorable dessert experience, give these mini Baked Alaskas a try. They’re not just desserts; they’re conversation pieces, memory makers, and proof that sometimes, the extra effort in the kitchen creates something truly extraordinary.

