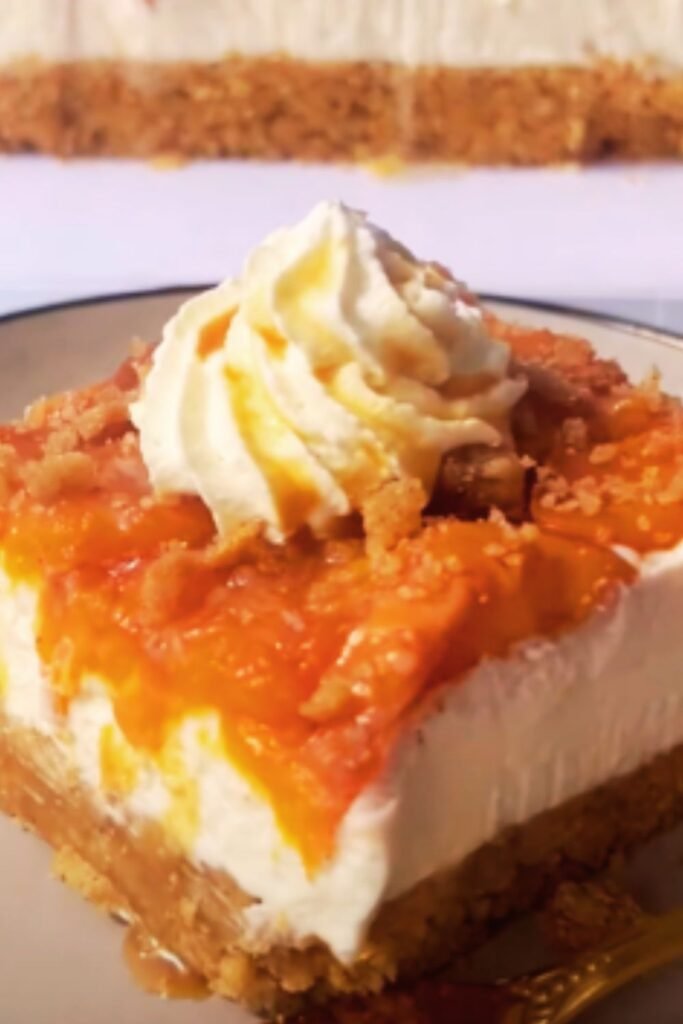
The moment I laid eyes on these perfectly ripe peaches at my local farmers market, I knew exactly what I wanted to create. There’s something magical about the combination of juicy summer peaches and tart raspberries that makes my taste buds dance with joy. Today, I’m sharing my absolute favorite summer dessert recipe: a Peach and Raspberry Cheesecake Delight that perfectly captures the essence of the season.
This isn’t just any cheesecake. The buttery graham cracker crust provides the perfect foundation for a velvety cream cheese filling that’s lightened with a touch of Greek yogurt. But the real stars are the fresh peaches and raspberries, which create a stunning topping that’s as beautiful as it is delicious. The sweet-tart balance is simply perfect, and a drizzle of honey brings everything together in harmony.
The Magic of Seasonal Fruits
Before diving into the recipe, let me share why I’m so passionate about using peaches and raspberries together. Peaches reach their prime in late summer, offering incredible natural sweetness and that distinctive floral aroma that can’t be replicated in any artificial flavoring. Raspberries, with their bright acidity and subtle sweetness, create the perfect counterpoint.
I always recommend using the freshest, ripest fruits you can find. When selecting peaches, look for fruits that yield slightly to gentle pressure and have a sweet, fragrant aroma. For raspberries, choose plump berries with a deep color and avoid any containers with crushed fruit or mold.
Ingredients You’ll Need
For the crust:
- 2 cups graham cracker crumbs (about 16 full crackers)
- 1/4 cup granulated sugar
- 1/2 cup unsalted butter, melted
- 1/4 teaspoon salt
For the filling:
- 24 ounces cream cheese, at room temperature (3 standard packages)
- 1 cup granulated sugar
- 1 cup full-fat Greek yogurt
- 3 large eggs, at room temperature
- 1 tablespoon pure vanilla extract
- 2 tablespoons fresh lemon juice
- 2 tablespoons all-purpose flour
For the fruit topping:
- 3 ripe peaches, sliced
- 2 cups fresh raspberries
- 3 tablespoons honey
- 1 tablespoon lemon juice
- 1 teaspoon vanilla extract
- 1 tablespoon cornstarch (optional, for thickening)
- 2 tablespoons water (if using cornstarch)
Essential Equipment
- 9-inch springform pan
- Parchment paper
- Food processor (for crushing graham crackers)
- Electric mixer (stand or handheld)
- Large mixing bowls
- Measuring cups and spoons
- Rubber spatula
- Shallow roasting pan (for water bath)
- Aluminum foil
- Cooling rack
Step-by-Step Instructions
Preparing the Crust
- Preheat your oven to 325°F (165°C).
- Wrap the outside of a 9-inch springform pan with aluminum foil, making sure it comes at least halfway up the sides. This prevents water from seeping in during baking.
- In a food processor, pulse graham crackers until they form fine crumbs.
- In a medium bowl, combine the graham cracker crumbs, sugar, and salt.
- Pour in the melted butter and mix until the mixture resembles wet sand.
- Press the crumb mixture firmly into the bottom and about 1 inch up the sides of the springform pan. Use the bottom of a measuring cup to compact it evenly.
- Bake the crust for 10 minutes, then remove from the oven and let cool while preparing the filling. Leave the oven on.
Creating the Perfect Filling
- In the bowl of a stand mixer fitted with the paddle attachment (or using a hand mixer), beat the cream cheese on medium speed until completely smooth, about 3 minutes.
- Gradually add the sugar and continue beating until the mixture is light and fluffy, about 2 more minutes.
- Add the Greek yogurt, vanilla extract, and lemon juice, beating until incorporated.
- Add the eggs one at a time, beating on low speed just until each is incorporated. Be careful not to overmix after adding the eggs, as this can cause the cheesecake to crack.
- Sprinkle the flour over the mixture and beat on low just until combined.
- Pour the filling into the cooled crust.
The Water Bath Method
I’ve learned through many trials (and some spectacular failures) that the water bath is non-negotiable for achieving that perfectly smooth, crack-free cheesecake texture. Here’s how I do it:
- Place the foil-wrapped springform pan in a larger roasting pan.
- Pour hot water into the roasting pan until it reaches about halfway up the sides of the springform pan.
- Carefully transfer the setup to the preheated oven.
- Bake for 55-65 minutes, until the edges are set but the center still has a slight jiggle.
- Turn off the oven, crack the door open, and let the cheesecake cool in the oven for 1 hour. This gradual cooling helps prevent cracks.
- Remove from the oven and water bath, discard the foil, and let cool completely on a wire rack.
- Once cooled to room temperature, cover and refrigerate for at least 4 hours or preferably overnight.
Preparing the Fruit Topping
- About an hour before serving, prepare the fruit topping.
- Wash and slice the peaches into thin wedges (no need to peel unless you prefer it).
- In a medium saucepan, combine honey, lemon juice, and vanilla extract over medium heat.
- If you prefer a thicker topping, mix the cornstarch with water to create a slurry and add it to the pan, stirring until the mixture thickens slightly.
- Remove from heat and let cool for 5 minutes.
- Gently toss the peach slices in the honey mixture, being careful not to break them.
- Let the peaches cool completely before arranging them on the cheesecake.
- Arrange the fresh raspberries between the peach slices.
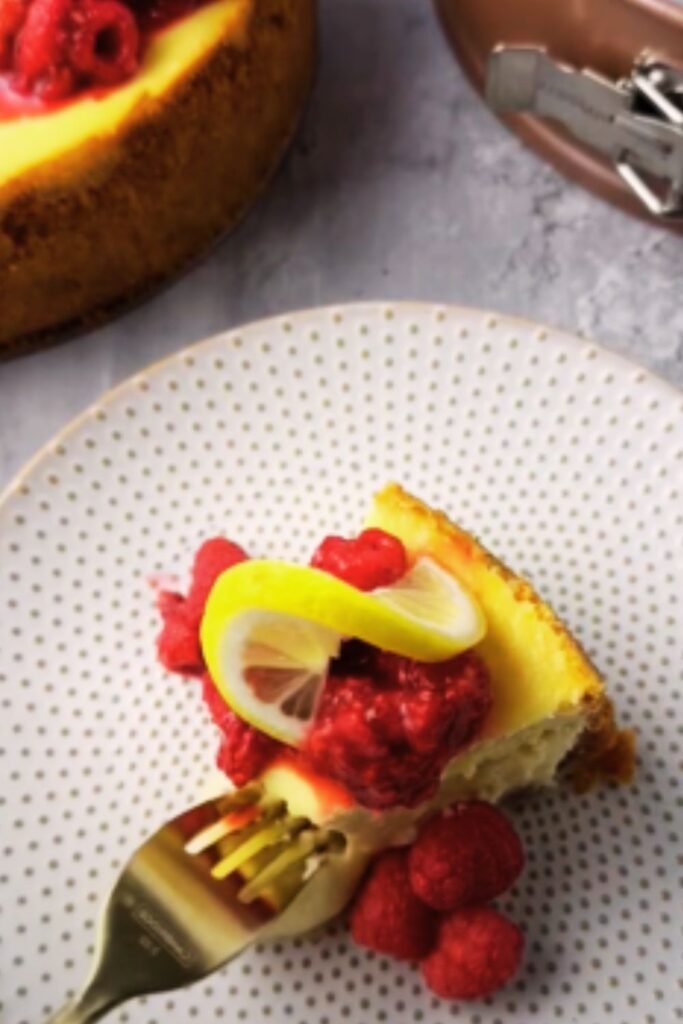
Presentation Tips
The way you present this cheesecake can elevate it from a simple dessert to a showstopping finale for any summer gathering. Here are my favorite presentation ideas:
- Create a spiral pattern with alternating peach slices and raspberries, starting from the outside edge and working your way to the center.
- Add a few mint leaves for a pop of green color and fresh aroma.
- Just before serving, dust the edges with a little powdered sugar for a professional touch.
- Serve each slice with an additional small drizzle of honey and a few extra berries on the side.
Nutritional Information
For those watching their nutrition intake, here’s a breakdown of what you can expect per slice (assuming 12 slices per cheesecake):
| Nutrient | Amount per Slice |
|---|---|
| Calories | 420 |
| Total Fat | 28g |
| Saturated Fat | 16g |
| Cholesterol | 130mg |
| Sodium | 320mg |
| Total Carbohydrates | 38g |
| Dietary Fiber | 2g |
| Sugars | 30g |
| Protein | 7g |
| Calcium | 10% DV |
| Iron | 4% DV |
| Vitamin C | 15% DV |
| Vitamin A | 12% DV |
Variation Ideas
While I think this recipe is pretty perfect as is, I love experimenting with different variations. Here are some of my favorite twists:
Crust Variations
- Substitute gingersnap cookies for graham crackers
- Use shortbread cookies for a buttery base
- Try a combination of graham crackers and finely chopped nuts
Filling Variations
- Add 1 teaspoon of almond extract for a subtle nutty flavor
- Incorporate 2 tablespoons of peach schnapps for an enhanced peach flavor
- Fold 1/2 cup of white chocolate chips into the batter
Topping Variations
- Replace raspberries with blackberries or blueberries
- Create a mixed berry topping with all three berries
- Add a layer of peach preserves between the cheesecake and fresh fruit

Troubleshooting Common Issues
Even experienced bakers encounter problems sometimes. Here are solutions to the most common cheesecake challenges:
| Problem | Possible Cause | Solution |
|---|---|---|
| Cracked surface | Overmixing or rapid temperature changes | Beat ingredients just until combined, cool gradually in the oven |
| Soggy crust | Water leaked into foil wrapper | Use heavy-duty foil or double-wrap the pan |
| Filling too soft | Underbaking or incorrect proportions | Bake until edges are set but center jiggles slightly |
| Sunken middle | Opening oven door during baking | Resist the urge to check; use oven light instead |
| Sticking to pan | Not properly greased | Line bottom with parchment paper and lightly grease sides |
| Fruit bleeding into cheese | Topping added while cheesecake is warm | Ensure cheesecake is completely chilled before adding fruit |
Make-Ahead and Storage Tips
One of the things I love most about this dessert is how well it works for entertaining. I can make it a day or two ahead and focus on other aspects of the meal on the day of serving.
- The cheesecake (without topping) can be made up to 3 days in advance and kept refrigerated.
- For longer storage, you can freeze the plain cheesecake for up to 1 month. Wrap it well in plastic wrap and then foil.
- Always add the fruit topping just before serving or at most 2 hours ahead.
- Leftover cheesecake will keep in the refrigerator for up to 5 days, though the fruit may soften significantly after 2 days.
Serving Suggestions
This cheesecake is absolutely divine on its own, but I sometimes like to offer accompaniments for guests to customize their experience:
- A small pitcher of warm honey for drizzling
- Lightly sweetened whipped cream
- A dish of crushed amaretti cookies for sprinkling
- Fresh mint-infused iced tea as a beverage pairing
- Sparkling water with peach slices for a refreshing non-alcoholic option
- Peach or raspberry sorbet for an extra-special summer treat
Seasonal Adaptations
While this recipe showcases summer fruits at their peak, I’ve adapted it throughout the year with equally delicious results:
- Spring: Strawberry and rhubarb topping
- Fall: Cinnamon-spiced apple and cranberry
- Winter: Poached pear and dried cherry
- Year-round: Mixed berry topping using frozen (thawed) berries
Special Diet Modifications
I believe everyone should be able to enjoy this delightful dessert, regardless of dietary restrictions. Here are some tested modifications:
Gluten-Free Version
- Use gluten-free graham crackers or cookies for the crust
- Substitute the 2 tablespoons of all-purpose flour with cornstarch or a gluten-free flour blend
Lower Sugar Option
- Reduce sugar in the crust to 2 tablespoons
- Use 2/3 cup sugar in the filling
- Replace honey in the topping with a sugar-free honey alternative or a light brushing of reduced sugar preserves
Dairy-Free Alternative
While a truly dairy-free cheesecake is challenging, I’ve had success with:
- Using dairy-free cream cheese alternatives
- Substituting coconut cream for the Greek yogurt
- Using coconut oil instead of butter in the crust
Why This Recipe Works
After years of tweaking this recipe, I’ve discovered a few key techniques that make all the difference:
- Room temperature ingredients create a smoother filling without lumps
- The combination of cream cheese and Greek yogurt provides the perfect texture balance
- The water bath ensures gentle, even cooking
- Cooling in the oven prevents cracks from sudden temperature changes
- The honey-lemon glaze enhances the natural sweetness of the fruit without overwhelming it
Questions & Answers
Q: Can I use frozen fruits for this recipe?
While fresh fruits provide the best flavor and texture, you can use frozen peaches and raspberries in a pinch. Thaw them completely and drain well before using. Pat the fruit dry with paper towels to remove excess moisture that could make your topping soggy.
Q: My cheesecake cracked! What happened?
Don’t worry, it happens to everyone! Cracks usually occur from overmixing (which incorporates too much air), overbaking, or sudden temperature changes. Next time, try beating the ingredients just until combined, using the water bath method, and cooling the cheesecake gradually in the turned-off oven with the door slightly ajar.
Q: Can I make mini cheesecakes instead of one large one?
Absolutely! This recipe works beautifully for individual servings. Line a muffin tin with paper liners, press a thin layer of crust into each, and fill about 2/3 full with batter. Reduce the baking time to about 20-25 minutes. Top each mini cheesecake with a few pieces of fruit.
Q: How do I know when the cheesecake is done baking?
The perfect cheesecake should still have a slight jiggle in the center when you gently shake the pan. The edges should be set and slightly puffed, but the center (about 2-3 inches in diameter) should move like Jell-O. It will continue to cook as it cools and will set fully after refrigeration.
Q: Can I substitute the Greek yogurt with something else?
Yes, you can use sour cream as a 1:1 substitute for the Greek yogurt. The flavor will be slightly different, but equally delicious. If you’re looking for a lighter option, you can also use light cream cheese for up to half of the cream cheese called for in the recipe.
Q: How far in advance can I make this cheesecake?
The cheesecake base (without the fruit topping) can be made up to 3 days in advance and kept refrigerated. The fruit topping should be added no more than 2 hours before serving for the freshest appearance and flavor. If you need to make it further ahead, consider freezing the plain cheesecake and thawing it overnight in the refrigerator before topping and serving.
Q: My graham cracker crust crumbles when I slice the cheesecake. How can I fix this?
Try pressing the crust mixture more firmly into the pan before baking. Using the flat bottom of a measuring cup can help create an even, compact layer. Also, make sure you’re using enough melted butter to bind the crumbs together. Finally, chilling the cheesecake thoroughly before slicing with a clean, sharp knife dipped in hot water between cuts will give you cleaner slices.
I hope you enjoy making this Summer Bliss Peach and Raspberry Cheesecake Delight as much as I enjoy sharing it with friends and family. There’s something so rewarding about seeing faces light up when this beautiful dessert comes to the table. The combination of creamy cheesecake, buttery crust, and fresh summer fruits creates a symphony of flavors that truly captures the essence of the season. Happy baking!