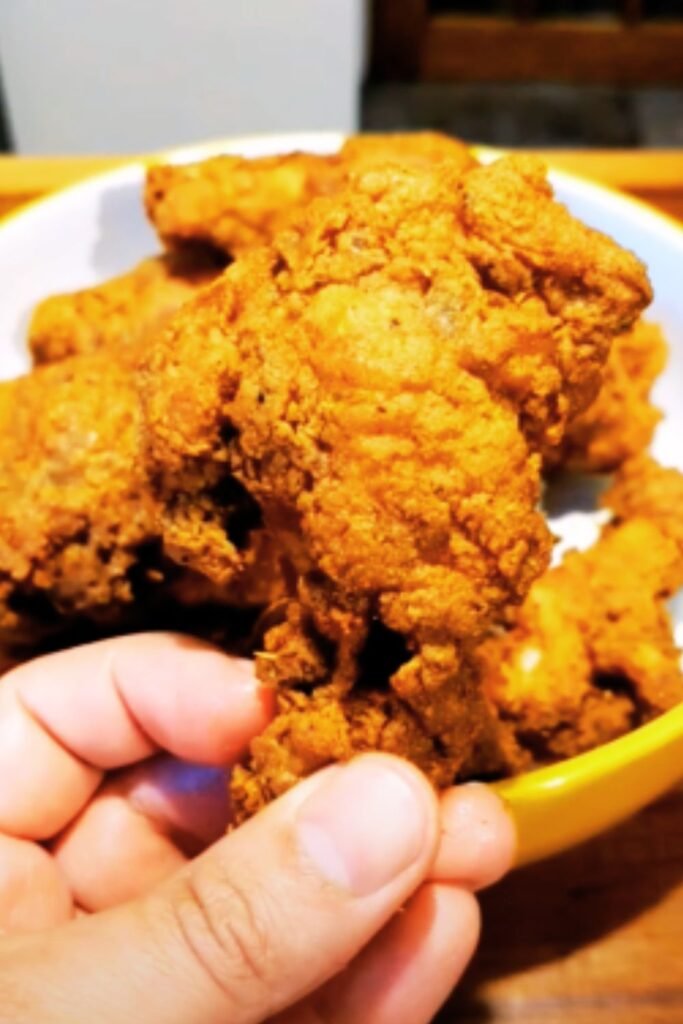
Have you ever craved that perfect crispy chicken but didn’t want to deal with the mess of deep frying or the wait time of oven baking? I’ve been there too many times to count. After countless experiments in my kitchen, I’ve perfected a gluten-free air fryer chicken recipe that delivers incredible crunch and flavor in just 15 minutes.
As someone who navigates gluten sensitivities while refusing to compromise on taste, I understand the frustration of bland or soggy gluten-free alternatives. This recipe changed everything for me, and I’m excited to share it with you today.
Why This Recipe Works
Before we dive into the ingredients and steps, let me tell you why this recipe is a game-changer:
- The air fryer creates that coveted crispy exterior while keeping the inside juicy
- Gluten-free ingredients that actually taste amazing (no cardboard texture here!)
- Only 15 minutes of cooking time makes this perfect for busy weeknights
- The cleanup is minimal compared to traditional frying methods
- Versatile enough to pair with countless sides or use in other recipes
Essential Ingredients
Every great recipe starts with quality ingredients. Here’s what you’ll need to gather:
| Ingredient | Amount | Notes |
|---|---|---|
| Chicken tenders or boneless thighs | 1 pound | Pat dry for best results |
| Gluten-free flour blend | 1 cup | Look for one with xanthan gum included |
| Eggs | 2 large | Room temperature works best |
| Almond milk | 1/4 cup | For egg wash mixture |
| Gluten-free panko breadcrumbs | 1 cup | Provides superior crunch |
| Cornflakes (GF certified) | 1/2 cup | Crushed for extra crispiness |
| Garlic powder | 1 tablespoon | Adds depth of flavor |
| Onion powder | 1 tablespoon | Enhances savory notes |
| Paprika | 2 teaspoons | For color and mild heat |
| Salt | 1 teaspoon | Adjust to taste |
| Black pepper | 1/2 teaspoon | Freshly ground is best |
| Avocado oil spray | As needed | High smoke point ideal for air frying |
Equipment You’ll Need
Having the right tools makes this recipe even easier:
- Air fryer (3.5 quart or larger)
- Three shallow bowls for dredging station
- Paper towels
- Meat thermometer
- Tongs
- Measuring cups and spoons
Step-by-Step Instructions
Let’s break down this simple process into manageable steps:
Preparation Phase
- Preheat your air fryer to 400°F (200°C) for 3-5 minutes.
- Pat the chicken pieces completely dry with paper towels. This is crucial for crispy results!
- Cut larger pieces into equal sizes to ensure even cooking.
- Set up your dredging station with three shallow bowls:
- Bowl 1: Gluten-free flour, 1/2 tsp salt, and 1/4 tsp black pepper
- Bowl 2: Beaten eggs and almond milk whisked together
- Bowl 3: Gluten-free panko, crushed cornflakes, garlic powder, onion powder, paprika, remaining salt and pepper
Coating Process
- Taking one piece at a time, dredge the chicken in the flour mixture, shaking off excess.
- Dip into the egg wash, allowing excess to drip off.
- Press firmly into the breadcrumb mixture, ensuring complete coverage.
- Place coated pieces on a plate and repeat with remaining chicken.
- Let the coated chicken rest for 5 minutes to help the coating adhere better.
Air Frying
- Lightly spray the air fryer basket with avocado oil.
- Arrange chicken pieces in a single layer, leaving space between each piece for air circulation.
- Lightly spray the tops of the chicken with oil for enhanced browning.
- Cook at 400°F for 7-8 minutes.
- Flip each piece over, spray lightly again, and cook for another 5-7 minutes until golden brown and crispy.
- Check that internal temperature reaches 165°F (74°C) with a meat thermometer.
- Work in batches if needed – overcrowding is the enemy of crispiness!
Pro Tips for Perfect Results
After making this recipe hundreds of times, I’ve discovered some secrets for the best possible outcome:
- Double-dip for extra crunch: For an even crispier coating, repeat the egg and breadcrumb steps.
- Rest before coating: Let chicken come to room temperature for 15 minutes before coating for more even cooking.
- Customize your spices: Add cayenne for heat, ranch seasoning for a tangy flavor, or Italian herbs for a Mediterranean twist.
- Spray, don’t drizzle: Using oil spray instead of drizzling ensures even distribution without sogginess.
- Let it rest: Allow the chicken to rest for 2-3 minutes after cooking to let the juices redistribute.
Common Mistakes to Avoid
I’ve made plenty of errors on my air fryer journey. Save yourself the trouble by avoiding these pitfalls:
- Skipping the preheating step: Just like an oven, your air fryer needs to be hot before adding food.
- Overcrowding the basket: This creates steam instead of crispy exteriors. Better to cook in batches!
- Using too much oil: A light spray is all you need – too much defeats the purpose of air frying.
- Neglecting to flip: Turning the chicken ensures even browning on all sides.
- Using wet chicken: Moisture is the enemy of crispiness. Always pat dry thoroughly!
Nutritional Information
For those tracking macros or with specific dietary needs, here’s the approximate nutritional breakdown per serving (based on 4 servings):
| Nutrient | Amount per Serving |
|---|---|
| Calories | 320 |
| Protein | 28g |
| Carbohydrates | 24g |
| Fiber | 2g |
| Sugar | 1g |
| Fat | 12g |
| Saturated Fat | 2g |
| Cholesterol | 145mg |
| Sodium | 520mg |
| Potassium | 380mg |
| Vitamin A | 4% DV |
| Vitamin C | 2% DV |
| Calcium | 6% DV |
| Iron | 10% DV |
Serving Suggestions
This versatile chicken works beautifully with countless sides and sauces. Here are my favorite pairings:
Side Dishes
- Crispy air-fried sweet potato fries
- Fresh green salad with lemon vinaigrette
- Steamed broccoli with garlic butter
- Quinoa pilaf with roasted vegetables
- Cauliflower “mac” and cheese
Dipping Sauces
- Honey mustard (1/4 cup mayonnaise, 2 tbsp Dijon mustard, 1 tbsp honey)
- Buffalo sauce (1/4 cup hot sauce, 2 tbsp melted butter)
- Ranch (look for certified gluten-free versions)
- BBQ sauce (check labels for gluten-free certification)
- Sweet chili sauce (most are naturally gluten-free, but always verify)
Make-Ahead and Storage Tips
Life gets busy, so here’s how to make this recipe work for meal prep:
Prep-Ahead Options
- Mix the dry coating ingredients and store in an airtight container for up to 1 month.
- Pre-cut chicken and store in the refrigerator for up to 2 days before cooking.
- Fully coat the chicken up to 2 hours before cooking, stored uncovered in the refrigerator.
Storage Instructions
- Refrigerate leftover cooked chicken in an airtight container for up to 3 days.
- Freeze cooked chicken for up to 2 months in freezer-safe bags.
Reheating Methods
- Air fryer: 3-4 minutes at 350°F for the crispiest results
- Oven: 10 minutes at 350°F on a wire rack
- Microwave: 1-2 minutes at 70% power (note: loses crispiness but remains juicy)
Variations to Try
Once you’ve mastered the basic recipe, these variations can keep things interesting:
Flavor Variations
- Lemon Pepper: Add 2 tablespoons lemon zest and 1 tablespoon coarse black pepper to the coating
- Coconut Crusted: Replace half the panko with unsweetened shredded coconut
- Parmesan Herb: Add 1/4 cup grated parmesan (check for gluten-free) and 1 tablespoon Italian herbs
- Spicy Buffalo: Mix 1 tablespoon hot sauce into the egg wash and add 1 teaspoon cayenne to the coating
Dietary Adaptations
- Dairy-Free: Already dairy-free as written!
- Egg-Free: Substitute egg wash with 1/4 cup gluten-free mayonnaise thinned with 1 tablespoon water
- Keto-Friendly: Replace breadcrumbs with crushed pork rinds and almond flour
- Paleo: Use tapioca flour and almond flour instead of gluten-free flour blend
Troubleshooting Guide
Even with the best recipes, things can go wrong. Here’s how to fix common issues:
| Problem | Possible Cause | Solution |
|---|---|---|
| Coating falls off | Flour not shaken off properly | Ensure excess flour is removed before egg wash |
| Chicken too wet | Pat completely dry before starting | |
| Oil spray too heavy | Use a light mist of oil spray | |
| Chicken not crispy | Air fryer overcrowded | Cook in smaller batches |
| Temperature too low | Ensure preheating to full temperature | |
| Not enough oil spray | Light spray helps browning | |
| Chicken too dry | Overcooked | Use a meat thermometer to avoid overcooking |
| Pieces too thin | Choose thicker cuts or adjust cooking time | |
| Uneven cooking | Different sized pieces | Cut chicken to uniform thickness |
| Not flipped during cooking | Turn pieces halfway through cooking |
Time-Saving Hacks
On those extra busy days, try these shortcuts:
- Use pre-cut chicken tenders rather than cutting your own
- Prepare the coating mix in bulk and store for future use
- Skip the resting time if you’re really in a hurry (though results won’t be quite as good)
- Use parchment paper liners in your air fryer for easier cleanup
Why Air Frying Works So Well for Gluten-Free Cooking
I’ve found that air frying has revolutionized gluten-free cooking for several reasons:
- The intense circulating heat helps gluten-free coatings crisp up more effectively
- Less oil absorption means the coating stays intact rather than becoming soggy
- Faster cooking times prevent the gluten-free breading from drying out too much
- The contained cooking environment helps hold moisture in the meat
This technique has been a game-changer for me and many others with gluten sensitivities who miss the texture of traditional fried foods.
Frequently Asked Questions
Over the years, I’ve received many questions about this recipe. Here are the most common ones:
Q: Can I use chicken with bones (like wings or drumsticks)? Yes! Bone-in pieces will require longer cooking time. For drumsticks or wings, cook at 380°F for 10 minutes, flip, then another 8-10 minutes until internal temperature reaches 165°F.
Q: What’s the best gluten-free flour blend to use? I prefer blends that contain rice flour, potato starch, and tapioca starch with xanthan gum already included. Bob’s Red Mill 1-to-1 and King Arthur Measure for Measure both work exceptionally well.
Q: My air fryer is smaller than 3.5 quarts. Can I still make this? Absolutely! You’ll just need to cook in more batches. Maintain the single layer rule for crispiest results.
Q: Can I make this without an air fryer? Yes, you can bake these in a conventional oven at 425°F for about 20-25 minutes, flipping halfway. Place on a wire rack over a baking sheet for best results.
Q: How do I know when the chicken is done without a meat thermometer? While a thermometer is most reliable, you can also cut into the thickest piece – the juices should run clear and there should be no pink in the center.
Q: My coating doesn’t get as golden as I’d like. What am I doing wrong? Try adding a teaspoon of turmeric to your coating for color without changing the flavor, or increase the paprika. A light spray of oil before cooking also enhances browning.
Q: Is this recipe suitable for meal prep? Definitely! The chicken stays crispy for about a day in the refrigerator. For longer storage, I recommend reheating in the air fryer or oven rather than microwave to maintain crispiness.
Q: Can I freeze the raw, breaded chicken to cook later? Yes! Flash freeze the breaded pieces on a baking sheet, then transfer to a freezer bag. Cook from frozen, adding 3-4 minutes to the cooking time.
Final Thoughts
This 15-minute gluten-free air fryer chicken has truly been a lifesaver in my kitchen. It proves that dietary restrictions don’t have to mean bland, boring food or hours spent cooking. The combination of convenience, health benefits, and incredible flavor makes this recipe one I return to weekly.
What I love most about this technique is its versatility. Once you master the basic method, you can adapt it endlessly to suit your taste preferences or what you have in your pantry. The air fryer delivers that satisfying crunch we all crave without the guilt or mess of deep frying.
Whether you’re cooking for someone with celiac disease, managing gluten sensitivities, or simply looking for a quick and delicious chicken recipe, I’m confident this will become a staple in your recipe collection. The days of disappointing gluten-free alternatives are behind us – this chicken rivals any traditional fried version in both texture and flavor.
So pull out your air fryer, gather your ingredients, and get ready to enjoy crispy, juicy chicken in just 15 minutes. Your taste buds (and schedule) will thank you!