There’s something magical about watching pita bread puff up in the oven, creating those perfect pockets that make this Middle Eastern staple so beloved worldwide. I’ve been making pita bread at home for over a decade, and I can confidently say that once you master this simple yet rewarding recipe, you’ll never want to buy store-bought pita again.
The beauty of homemade pita lies not just in its superior taste and texture, but in the satisfaction of creating something so versatile from just a handful of basic ingredients. Whether you’re planning a Mediterranean feast, looking for the perfect vessel for your favorite dips, or simply want to elevate your sandwich game, mastering pita bread will transform your home cooking experience.
Understanding Pita Bread: The Foundation of Mediterranean Cuisine
Pita bread is a round, leavened flatbread that originates from the Middle East and Mediterranean regions. What sets pita apart from other flatbreads is its unique ability to form a pocket when baked at high temperatures, creating a hollow center perfect for stuffing with various fillings.
Leavening refers to the process by which gases are incorporated into dough to make it rise, typically through yeast fermentation or chemical leavening agents.
Gluten development is the formation of elastic protein networks in dough through kneading, which gives pita its characteristic chewy texture and ability to hold its shape.
Steam puffing is the phenomenon that creates pita’s signature pocket, occurring when moisture in the dough rapidly converts to steam in a hot oven.
The science behind pita’s puffing action fascinates me every time I bake a batch. When the rolled dough hits the hot oven surface, the moisture inside quickly turns to steam, causing the bread to inflate like a balloon. This rapid expansion creates the hollow interior that makes pita so functional for stuffing with everything from falafel to grilled vegetables.
Essential Ingredients for Perfect Pita Bread
Creating exceptional pita bread starts with understanding your ingredients. Each component plays a crucial role in developing the texture, flavor, and structure that defines authentic pita.
| Ingredient | Purpose | Quality Tips | Substitutions |
|---|---|---|---|
| Bread Flour | Provides structure and chewiness | Look for 12-14% protein content | All-purpose flour (slightly less chewy) |
| Active Dry Yeast | Creates rise and flavor development | Check expiration date, proof before using | Instant yeast (use 25% less) |
| Warm Water | Activates yeast and hydrates flour | 105-110°F for optimal yeast activity | Milk for richer flavor |
| Olive Oil | Adds flavor and improves texture | Extra virgin for best taste | Vegetable oil or melted butter |
| Salt | Enhances flavor and controls yeast | Fine sea salt or kosher salt | Table salt (use slightly less) |
| Sugar | Feeds yeast and aids browning | Granulated white sugar | Honey or maple syrup |
The flour choice significantly impacts your final result. I always recommend bread flour for its higher protein content, which develops stronger gluten networks. This translates to better pocket formation and a more satisfying chew. However, I’ve successfully made pita with all-purpose flour when bread flour wasn’t available – the texture is slightly more tender but still delicious.
Water temperature is critical for yeast activation. Too hot, and you’ll kill the yeast; too cool, and fermentation will be sluggish. I use an instant-read thermometer to ensure accuracy, though with practice, you can gauge the temperature by touch – it should feel comfortably warm, like a pleasant bath.
My Foolproof Pita Bread Recipe
After years of testing and refinement, this recipe consistently produces pita bread with excellent puff, perfect texture, and authentic flavor. The key lies in proper hydration, adequate kneading, and precise timing.
Ingredients:
- 3 cups bread flour
- 1 packet (2¼ teaspoons) active dry yeast
- 1 teaspoon sugar
- 1 teaspoon salt
- 1 cup warm water (105-110°F)
- 2 tablespoons extra virgin olive oil
Instructions:
Step 1: Activate the Yeast In a small bowl, combine warm water, sugar, and yeast. Stir gently and let stand for 5-10 minutes until foamy and doubled in size. This proofing step ensures your yeast is alive and active.
Step 2: Mix the Dough In a large mixing bowl, combine flour and salt. Create a well in the center and pour in the activated yeast mixture and olive oil. Using a wooden spoon or your hands, mix until a shaggy dough forms.
Step 3: Knead to Perfection Turn the dough onto a lightly floured surface and knead for 8-10 minutes until smooth and elastic. The dough should be slightly sticky but not wet. If it’s too dry, add water one tablespoon at a time. If too wet, add flour gradually.
Step 4: First Rise Place the kneaded dough in an oiled bowl, turning to coat all sides. Cover with a damp towel and let rise in a warm place for 1-2 hours until doubled in size.
Step 5: Divide and Shape Punch down the risen dough and turn onto a lightly floured surface. Divide into 8 equal portions and shape each into a smooth ball. Cover with a towel and let rest for 15 minutes.
Step 6: Roll Out Working with one ball at a time, roll each into a circle approximately 6-7 inches in diameter and ¼ inch thick. Place on parchment-lined baking sheets, cover, and let rest for 30 minutes.
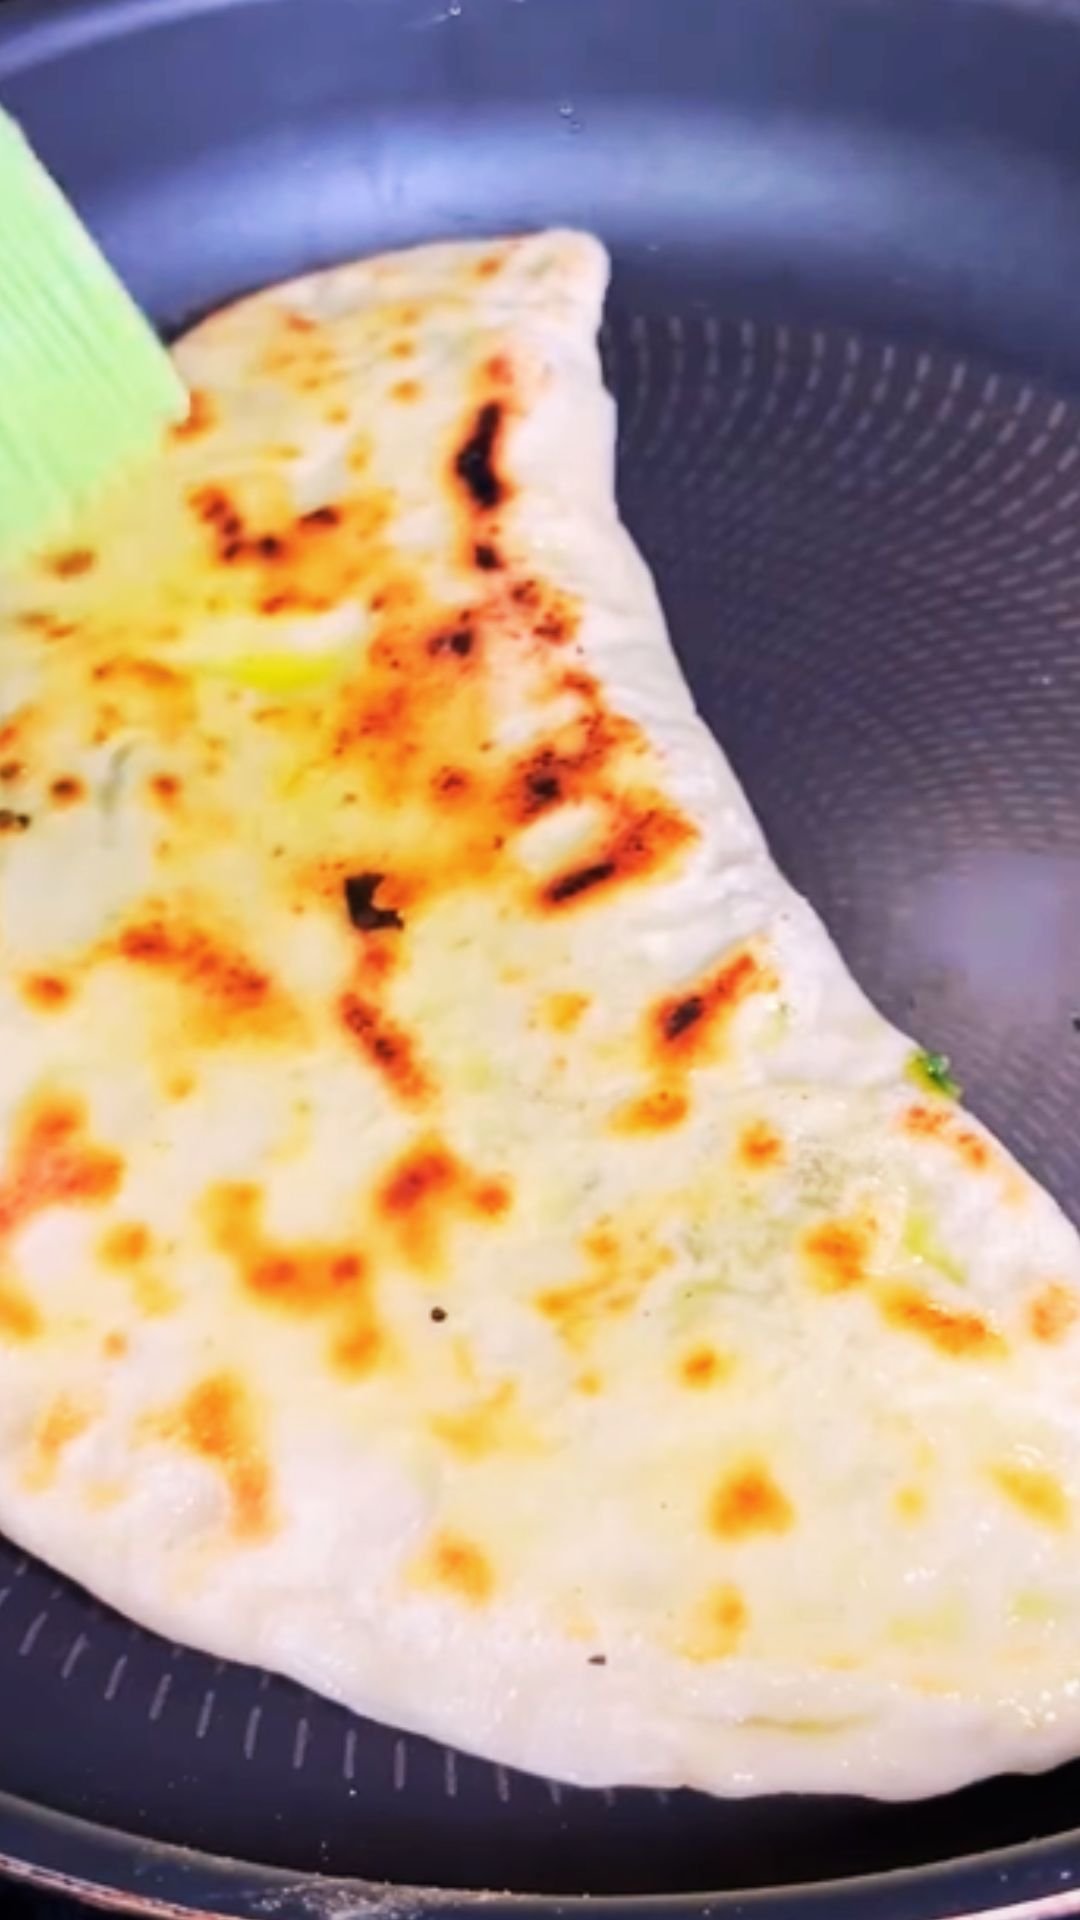
Step 7: Bake to Perfection Preheat your oven to 475°F with a baking stone or inverted baking sheet on the bottom rack. Carefully transfer 2-3 pita rounds directly onto the hot stone. Bake for 2-3 minutes until puffed and lightly golden. Remove and cool on a wire rack.
Advanced Techniques for Pita Perfection
The Oven Setup Method
Creating the perfect pita requires understanding your oven’s behavior. I’ve found that positioning matters enormously. Place your baking stone on the lowest rack, allowing at least 20 minutes for proper preheating. The intense bottom heat is crucial for rapid steam generation.
For those without a baking stone, an inverted heavy baking sheet works well. Cast iron also performs excellently, though it requires careful handling due to its heat retention properties.
Temperature Control Mastery
| Oven Temperature | Result | Best For |
|---|---|---|
| 450°F | Gentle puff, softer texture | Beginners, delicate fillings |
| 475°F | Ideal puff, balanced texture | Most recipes, versatile use |
| 500°F | Maximum puff, crispier exterior | Experienced bakers, sturdy fillings |
I typically bake at 475°F, which provides the perfect balance of puffing action and browning. Higher temperatures can cause excessive browning before proper puffing occurs, while lower temperatures may result in flat, dense bread.
Dough Hydration Science
The relationship between flour and water significantly affects your final product. I maintain a hydration level of approximately 60-65%, which provides enough moisture for steam generation while maintaining workability.
Hydration percentage is calculated by dividing the weight of water by the weight of flour, then multiplying by 100.
Environmental factors influence hydration needs. Humid climates may require slightly less water, while dry conditions might need additional moisture. I adjust by feel, aiming for dough that’s soft and pliable but not sticky.
Troubleshooting Common Pita Problems
Through years of teaching friends and family to make pita, I’ve encountered virtually every possible issue. Here’s my comprehensive troubleshooting guide:
Pita Won’t Puff
Insufficient gluten development: Knead longer to build elasticity Dough too thick: Roll thinner, aiming for ¼ inch thickness Oven not hot enough: Ensure proper preheating and temperature Old yeast: Always proof yeast before using Overproofed dough: Watch timing during final rise
Tough or Chewy Texture
Over-kneading: Knead just until smooth and elastic Too much flour: Measure accurately and avoid over-flouring surfaces Insufficient hydration: Add water gradually if dough seems dry Overbaking: Watch carefully and remove when lightly golden
Uneven Browning
Uneven rolling: Ensure consistent thickness across entire surface Hot spots in oven: Rotate baking stone periodically Dough temperature variations: Allow consistent resting time

Storage and Preservation Techniques
Proper storage extends the life of your homemade pita significantly. I’ve developed several methods based on intended use timeframes:
Short-term Storage (1-3 days)
Store completely cooled pita in an airtight container or plastic bag at room temperature. For maximum freshness, place a paper towel in the container to absorb excess moisture.
Medium-term Storage (1 week)
Refrigerate in airtight containers. Before serving, warm briefly in a 300°F oven or toast lightly to restore softness.
Long-term Storage (up to 3 months)
Freeze individual pita rounds separated by parchment paper in freezer bags. Thaw at room temperature or warm directly from frozen in a 350°F oven for 3-4 minutes.
| Storage Method | Duration | Texture Quality | Best Uses |
|---|---|---|---|
| Room Temperature | 2-3 days | Excellent | Fresh eating, sandwiches |
| Refrigerated | 5-7 days | Good (slight firming) | Toasting, warming |
| Frozen | 2-3 months | Very good when reheated | Meal prep, bulk storage |
Creative Variations and Flavor Enhancements
Once you’ve mastered basic pita, experimenting with variations keeps the bread exciting and tailored to different meals.
Herb-Infused Pita
Add 2 tablespoons of dried herbs (oregano, thyme, rosemary) to the flour mixture. Fresh herbs work too – use 3 tablespoons, finely chopped. This variation pairs beautifully with Mediterranean dishes.
Whole Wheat Pita
Substitute up to half the bread flour with whole wheat flour. Increase water slightly and expect a nuttier flavor with denser texture. I often add a tablespoon of honey to balance the wheat’s natural bitterness.
Garlic Pita
Incorporate 3-4 minced garlic cloves into the dough during mixing. The garlic mellows during baking, creating a subtly flavored bread perfect for dipping.
Sesame Seed Pita
Brush rolled dough with beaten egg and sprinkle with sesame seeds before baking. This creates a delightful crunch and nutty flavor that complements both sweet and savory fillings.
Serving Suggestions and Pairings
Pita bread’s versatility makes it suitable for countless applications. Here are my favorite ways to serve fresh homemade pita:
Traditional Middle Eastern Style
- Hummus and vegetables: Classic combination with carrots, cucumbers, and bell peppers
- Baba ganoush: Smoky eggplant dip that pairs perfectly with warm pita
- Tabbouleh: Fresh parsley salad that’s perfect for scooping
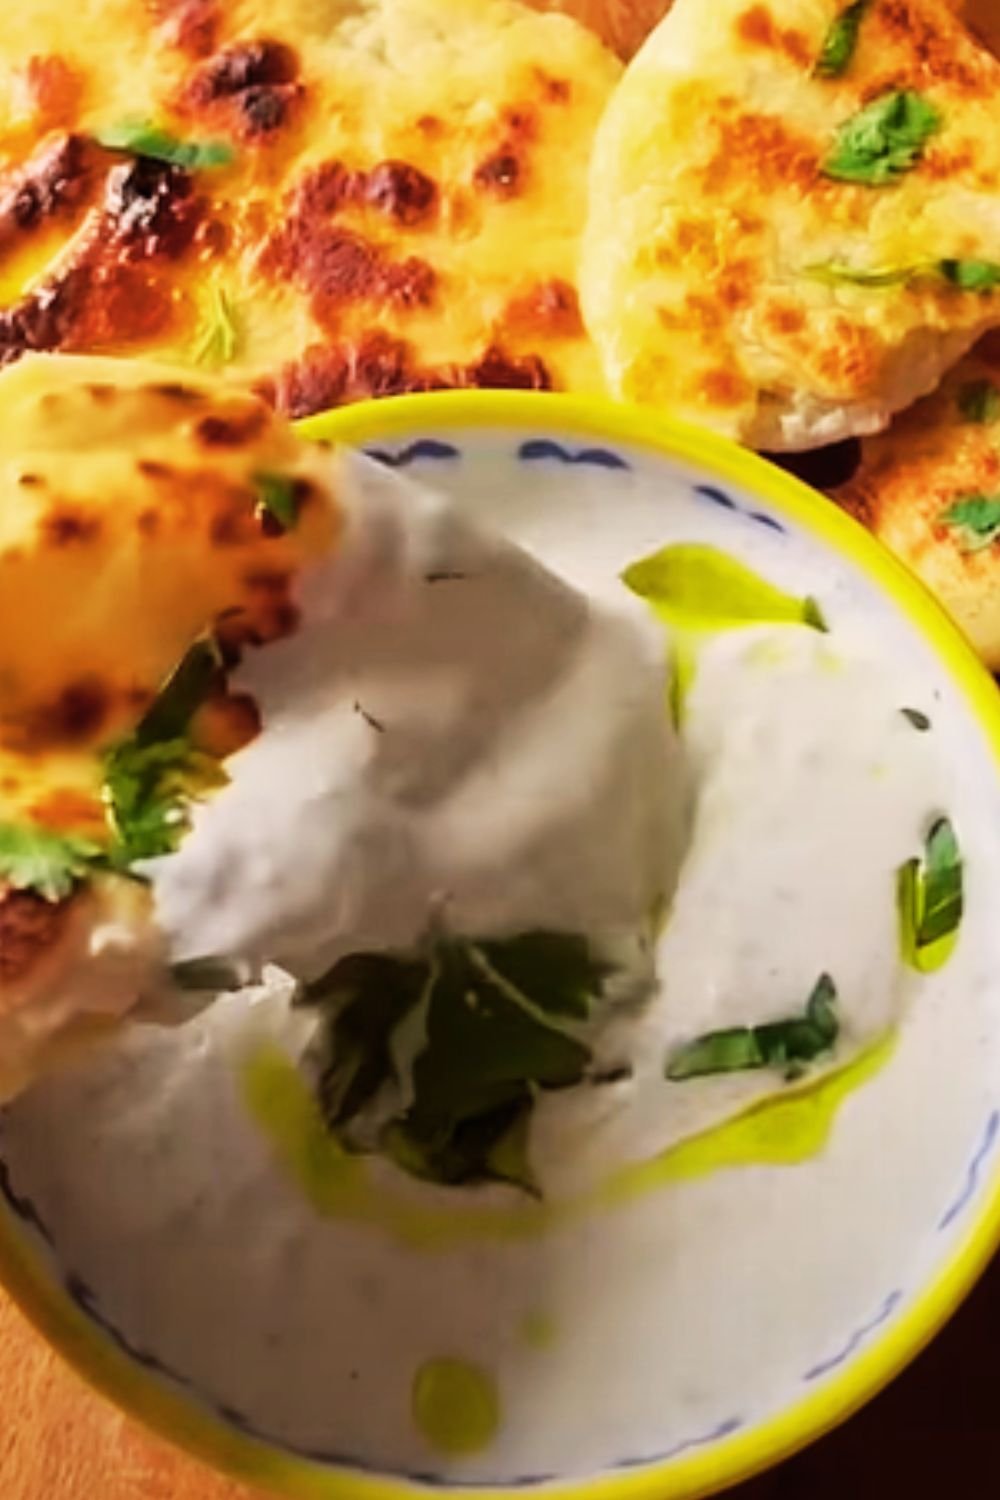
- Labneh with olive oil: Creamy cheese drizzled with quality olive oil and za’atar
International Fusion Applications
- Mediterranean wraps: Fill pockets with grilled chicken, feta, and tzatziki
- Indian-inspired: Stuff with spiced lentils and yogurt sauce
- Mexican fusion: Use as a base for shawarma-style tacos
- Italian influence: Top with tomatoes, mozzarella, and basil like a pizza
Creative Breakfast Uses
- Pita French toast: Slice pockets and use like bread for French toast
- Breakfast sandwiches: Fill with scrambled eggs and vegetables
- Sweet applications: Brush with butter and cinnamon-sugar, then toast
Nutritional Benefits and Dietary Considerations
Homemade pita offers several nutritional advantages over commercial varieties. By controlling ingredients, you eliminate preservatives and excessive sodium while maximizing nutritional value.
Nutritional Profile (per pita)
| Nutrient | Amount | % Daily Value |
|---|---|---|
| Calories | 165 | 8% |
| Carbohydrates | 32g | 11% |
| Protein | 5g | 10% |
| Fat | 2g | 3% |
| Fiber | 1g | 4% |
| Sodium | 245mg | 11% |
Dietary Adaptations
Gluten-Free Version: Use a blend of rice flour, tapioca starch, and xanthan gum. Results differ significantly from wheat-based pita but can be satisfying for those with celiac disease.
Lower Sodium: Reduce salt to ½ teaspoon without significantly affecting taste or texture.
Vegan-Friendly: The basic recipe is already vegan when using plant-based oils.
Whole Grain: Incorporate ancient grains like spelt or einkorn for enhanced nutrition and complex flavors.
Equipment and Tools for Success
While pita can be made with minimal equipment, certain tools significantly improve results and efficiency.
Essential Equipment
- Large mixing bowl: For comfortable dough mixing
- Kitchen scale: For precise measurements
- Rolling pin: For even thickness
- Baking stone or steel: For optimal heat transfer
- Instant-read thermometer: For water temperature accuracy
Nice-to-Have Tools
- Stand mixer with dough hook: Reduces kneading time and effort
- Bench scraper: For easy dough handling
- Pizza peel: For smooth stone transfers
- Proofing baskets: For shaped rising if making larger batches
The investment in a good baking stone pays dividends in pita quality. The thermal mass creates the intense heat necessary for proper puffing while providing even browning.
Q&A Section
Q: Why didn’t my pita bread puff up during baking? The most common reason is insufficient oven heat or a baking surface that’s not hot enough. Make sure your oven is properly preheated to 475°F and your baking stone has had at least 20 minutes to heat through. Also check that your dough isn’t rolled too thick – aim for ¼ inch thickness.
Q: Can I make pita bread without a baking stone? Absolutely! An inverted heavy baking sheet works well, though results may vary slightly. Cast iron skillets or pizza pans also work. The key is having a very hot surface that transfers heat quickly to create steam.
Q: How do I know if my yeast is still active? Always proof your yeast by dissolving it in warm water with a pinch of sugar. Within 5-10 minutes, it should become foamy and double in volume. If nothing happens, your yeast is dead and needs replacing.
Q: Can I prepare the dough ahead of time? Yes! You can make the dough up to 24 hours in advance. After the first rise, punch down the dough, cover tightly, and refrigerate. Let it come to room temperature before rolling and baking.
Q: What’s the best way to reheat leftover pita? For soft pita, wrap in damp paper towels and microwave for 15-20 seconds. For slightly crispy pita, toast in a dry skillet for 30 seconds per side, or warm in a 300°F oven for 2-3 minutes.
Q: Can I freeze pita dough? Yes, you can freeze the dough after the first rise. Wrap tightly in plastic wrap and freeze for up to 3 months. Thaw overnight in the refrigerator, then proceed with rolling and baking.
Q: Why is my pita tough instead of soft? This usually indicates over-kneading or using too much flour. Knead just until the dough is smooth and elastic, and be careful not to add excessive flour during rolling.
Q: How thin should I roll the pita? Aim for about ¼ inch thickness. Thinner than ⅛ inch may not puff properly, while thicker than ⅜ inch can result in dense, heavy bread.
Q: Is it normal for some pitas to not puff while others do? Some variation is normal, especially when you’re learning. Factors like slight thickness differences, oven hot spots, or dough temperature can affect individual pitas. Even flat pitas taste great and work well for wraps.
Q: Can I add herbs or spices to the dough? Definitely! Dried herbs work best – add 1-2 tablespoons to the flour mixture. Fresh herbs should be finely chopped and used sparingly to avoid affecting dough structure.
Making homemade pita bread connects you to centuries of baking tradition while providing incredibly fresh, flavorful results that far surpass store-bought versions. The process becomes intuitive with practice, and the satisfaction of pulling perfectly puffed pitas from your oven never gets old. Whether you’re hosting a dinner party or simply want to elevate your weeknight meals, mastering this essential bread will enhance your culinary repertoire immeasurably.
Remember that baking is both art and science – don’t be discouraged if your first batch isn’t perfect. Each attempt teaches you something new about dough behavior, oven characteristics, and timing. Keep notes on what works in your kitchen, and soon you’ll be creating pita bread that rivals the best Middle Eastern bakeries.